Tasks application
Introduction
Tasks are at the core of Freedcamp, which is why the Tasks application is one of our most feature-rich applications.
- List and Kanban views
- Table and Gantt views (Business and Enterprise plans).
- Due dates, Start dates (paid plans only), Priorities, Status, Followers, Attachments and inline images, Tags
- Custom Fields (Business and Enterprise plans).
- Custom Statuses - NEW! (Business and Enterprise plans).
- One-click actions, In-line editing, Shift dates, Bulk Editing, Undo function, Bin for deleted tasks
- Create subtasks for multiple users with one click (paid plans only)
- Recurrences (paid plans only)
- Multiple assignees (paid plans only)
- Copy and move tasks and task lists (paid plans only)
- Subtasks (available on Free and paid plans as Subtasks Pro)
- Logically combine Tasks into lists and archive completed lists easily.
- Use Widgets, Calendar, and Tasks Boards to see your tasks across one or multiple projects.
- Works great with Milestones application, you can link an existing Task with a Milestone.
- Never miss updates with custom email notifications and a Notifications page right inside Freedcamp.
- Export and import tasks to/from XLS
- Create new tasks by email with Email In (paid plan feature)
- Build custom reports with Data Feed Links (paid plan feature)
- Check the status of your projects with Reports (Business and Enterprise plans)
Please check our Add-ons for more information.
Adding-Removing the Tasks Add-On
By default when you create a project, the Tasks add-on is already installed together with Discussions, Calendar, and Files. If you'd like to remove this add-on or manage which users have access to it, please see this documentation article.
Getting Started
Accessing the Tasks application
Tasks is the default application of every project (unless you removed it), so clicking on a project will take you to the project's tasks app. You can also get there by clicking on a project's checkmark icon(✔)in the project picker, the projects board, the homepage, or a project's sidebar menu.
Adding Tasks
There are multiple ways to add a task to a project.
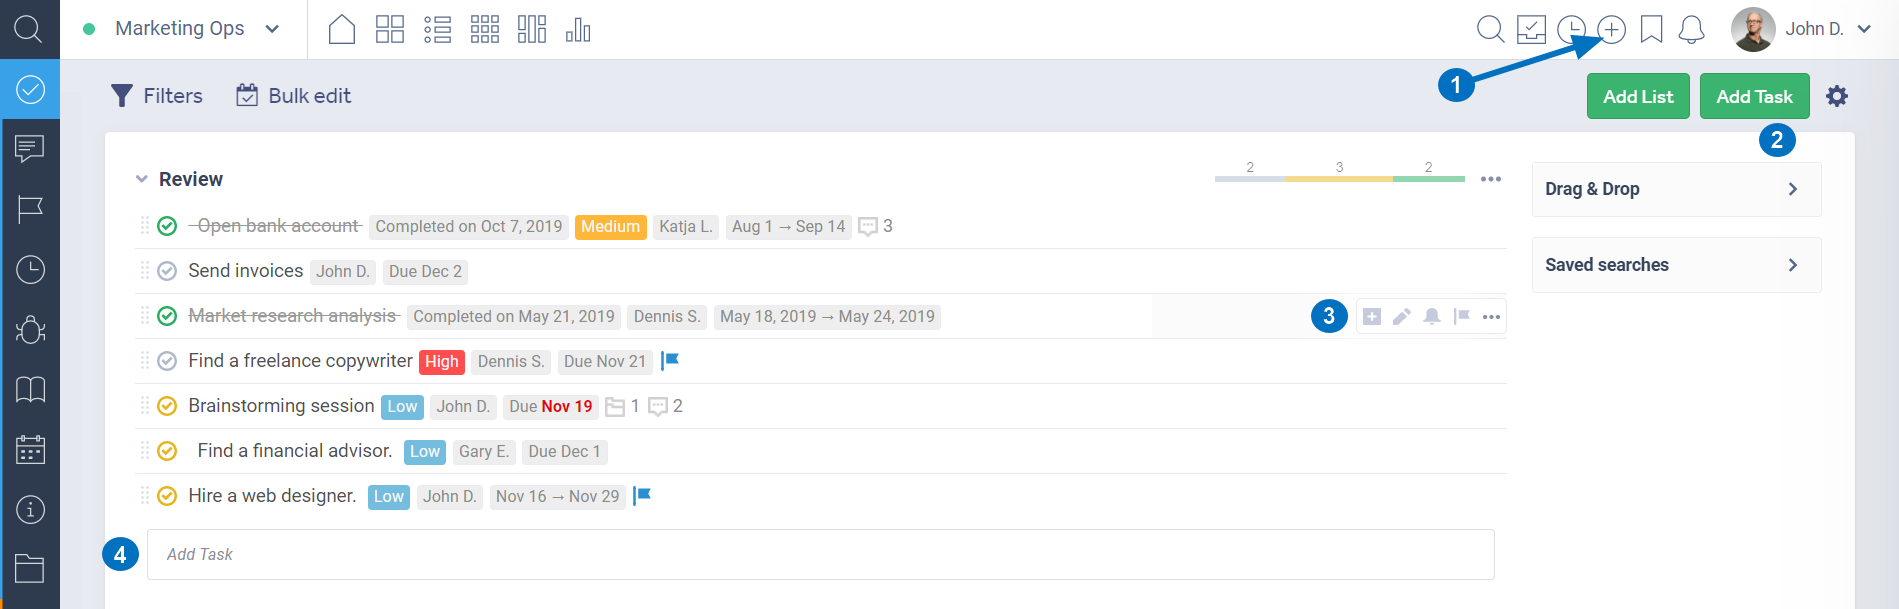
1. The Quick-Add icon in the top menu(accessible on all pages)
2. The Add Task Button in the top-right of the page
3. The Add Subtask icon when you hover over a task
4. The Quick Add field at the bottom of each task list
In Gantt's view, things work a bit differently. There's still an Add Task button in the top-right of the page, but there are also new ways to add a task.
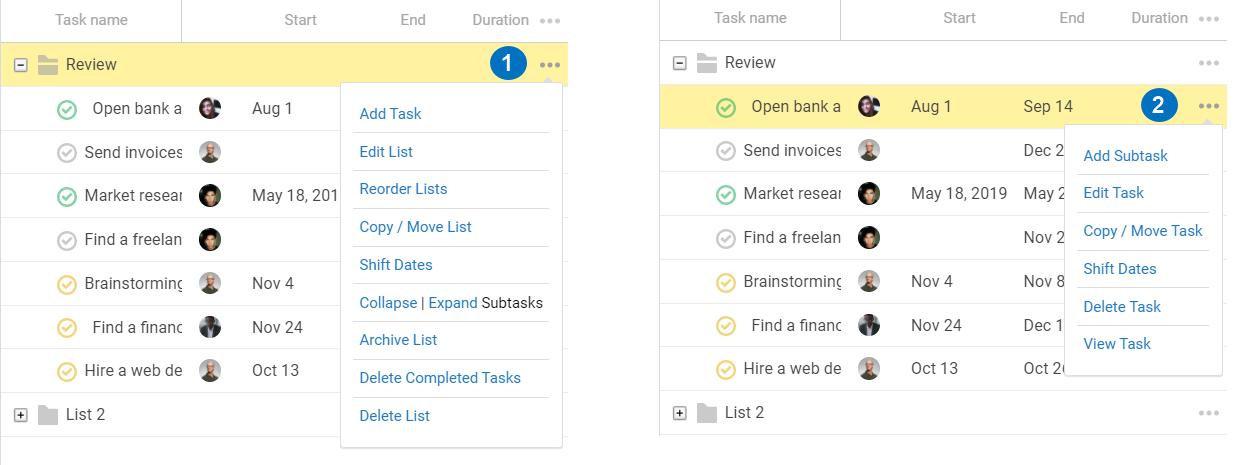
1. Click a task list's (...) menu and select Add Task to create a task.
2. Click a task's (...) menu and select Add Subtask to create a subtask.
Editing Tasks
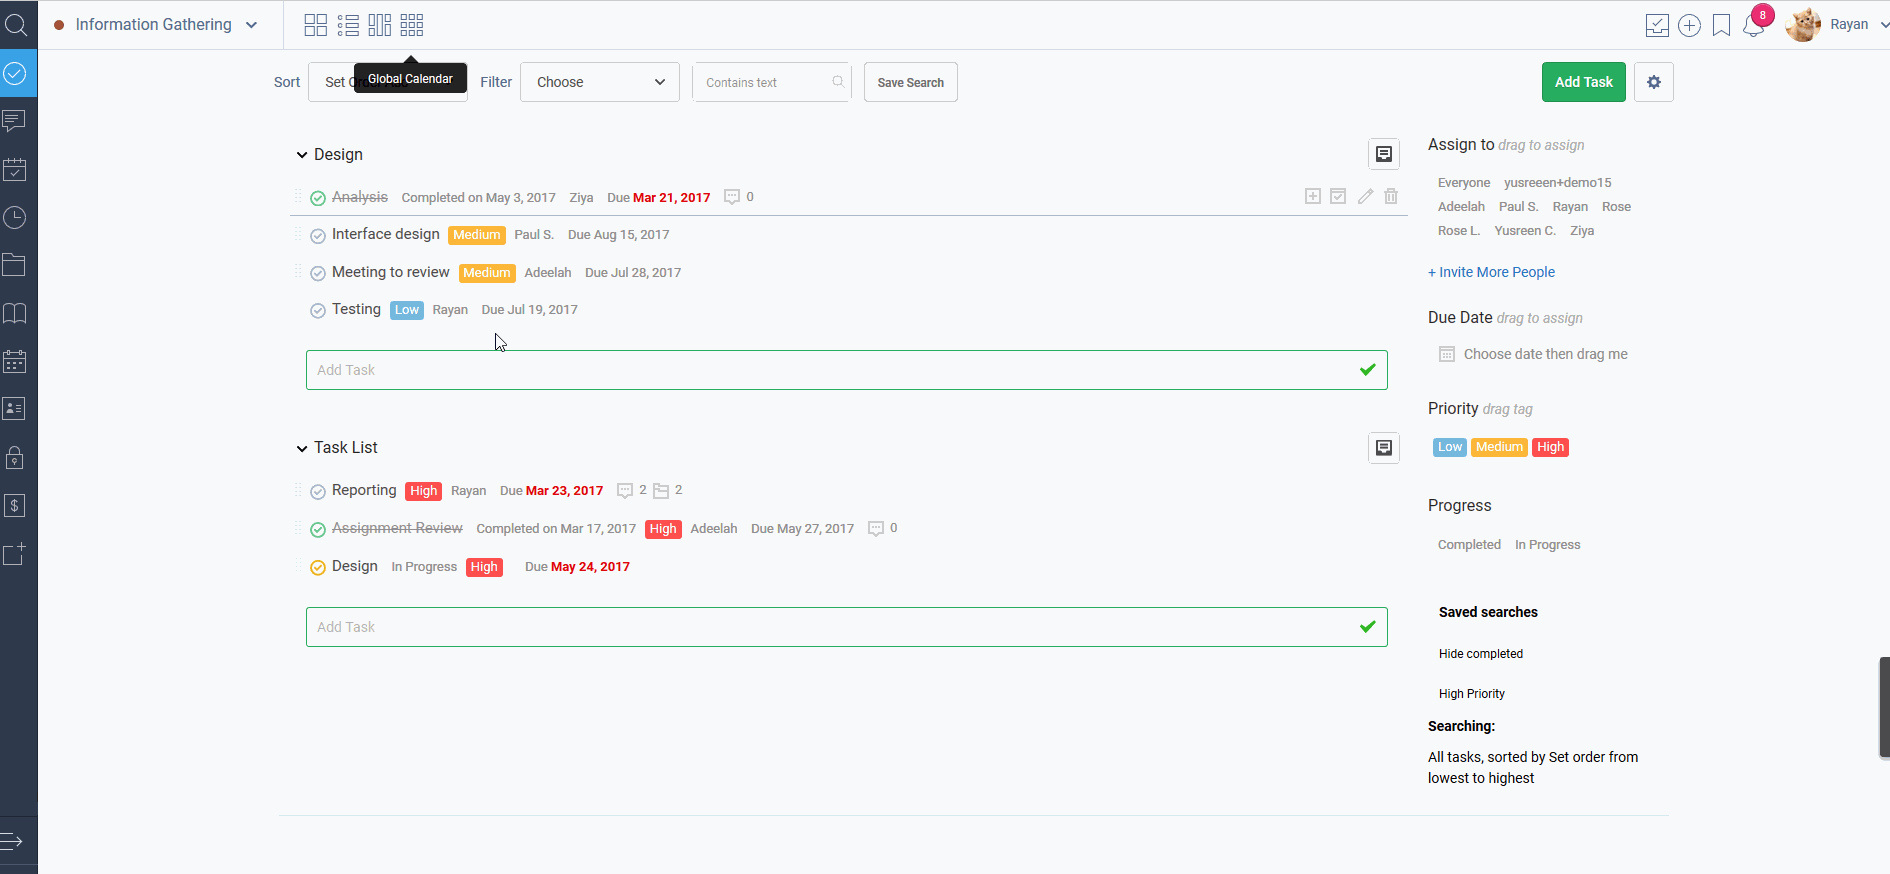
Quick Edit
All task attributes visible on the tasks page can be changed or edited by clicking on them: progress status, title(double click), assignee, priority level, start and due date, milestone linked, date completed.
(click the image above to enhance it)
The Edit Form
Some attributes are not available to edit on the page(like recurrence settings or descriptions), and require opening the task's edit form.
Bulk Edit
Bulk editing allows you to edit the same attributes on multiple tasks at once. There's also the option to delete or add a comment(great when you want to ask for status updates from multiple users).
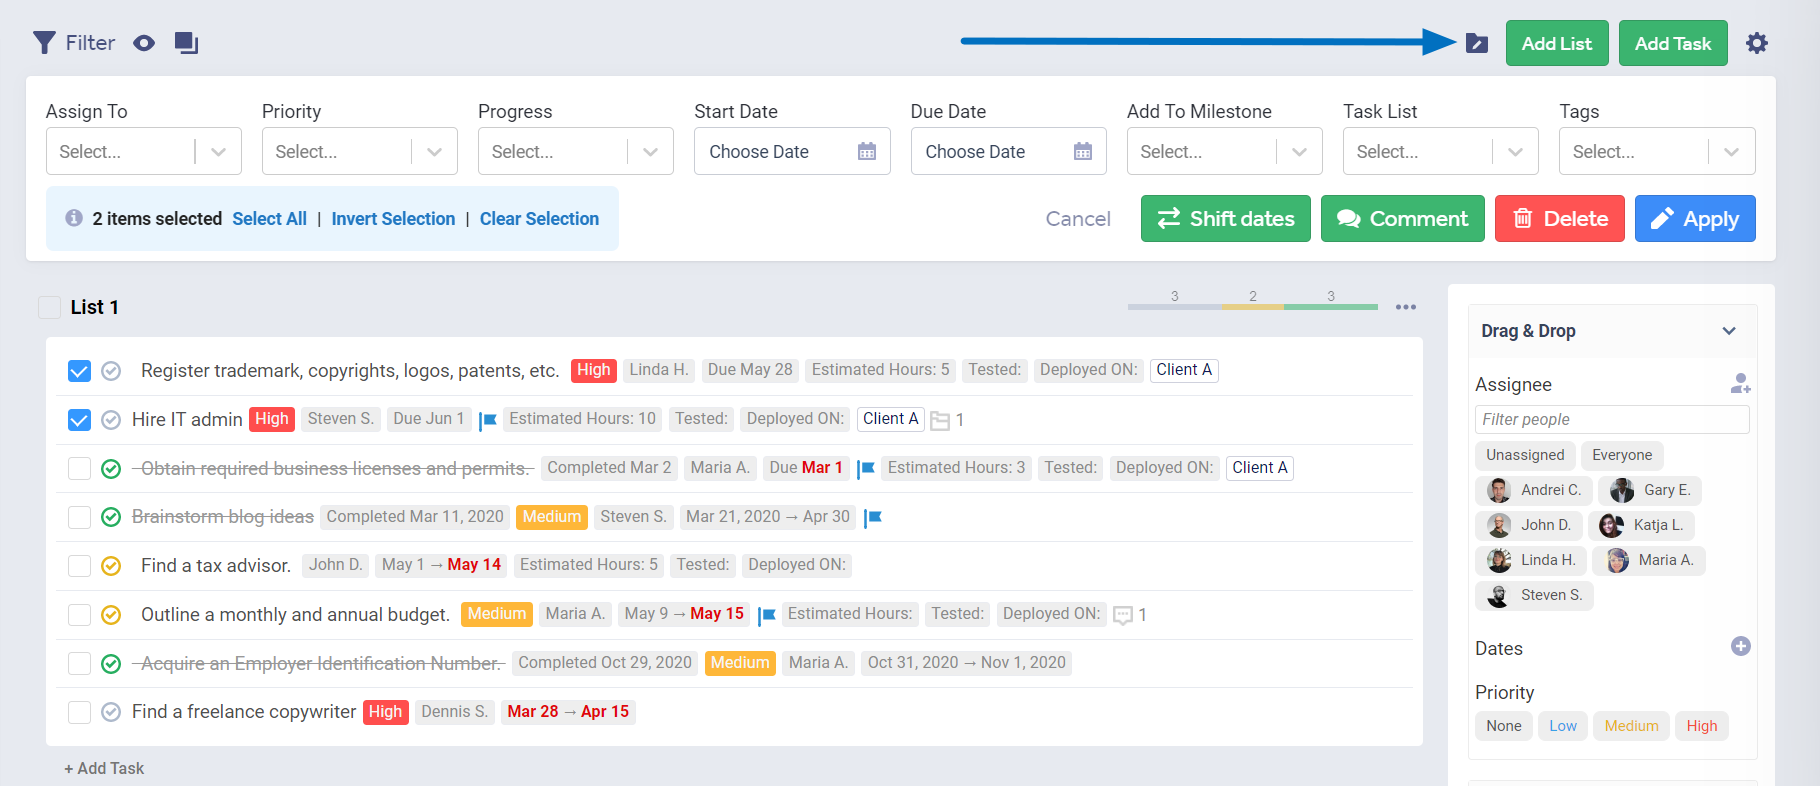
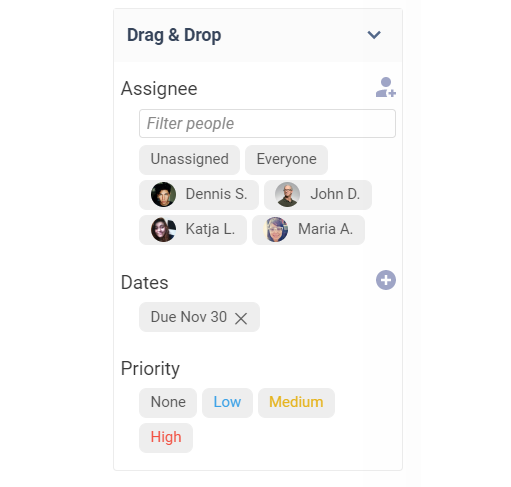
Drag and drop
The drag and drop section on the right side of the page has assignees, priority levels, and dates(which have to be set). You can drag and drop these attributes to a task to replace their current attributes.
Task Options
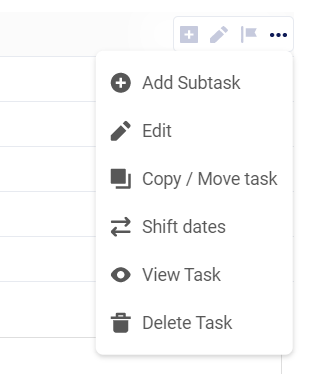
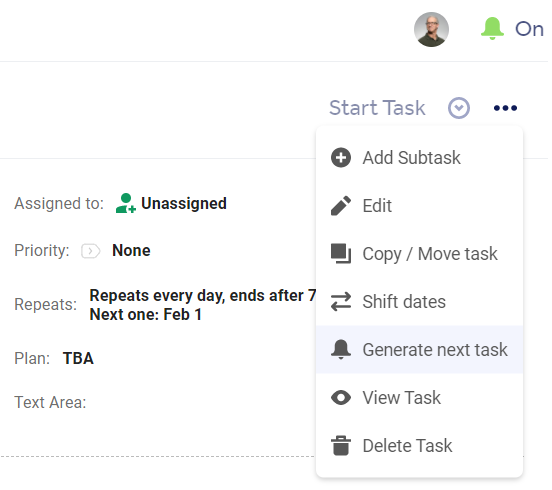
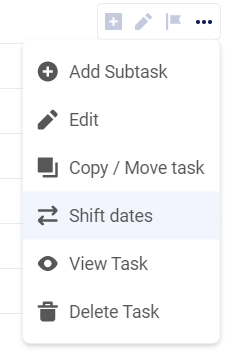
Clicking the 3-dot button at the right of a task will show multiple options: Add Subtask, Edit, Copy/Move Task, Shift Dates, View Task, Delete Task, and Unlink Task(if linked to a Milestone).
Recovering Deleted Tasks
You can recover deleted tasks by going to the project's Bin page.
Customizing tasks
- Custom Fields for Tasks (Business and Enterprise plans).
- Custom Statuses for Tasks (Business and Enterprise plans).
- Subtasks - free and paid plan versions
- Multiple Assignees - all paid plans.
List, Kanban, Table and Gantt Views
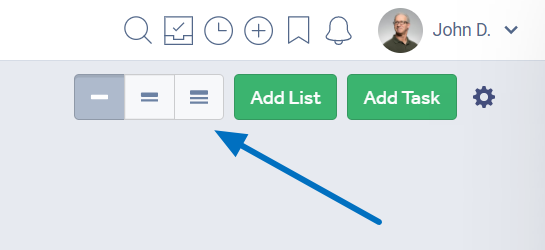
Switching Views
When you sign up and create your very first project, you'll be able to choose your preferred view: List, Kanban, and Gantt.
After your project has been created, you can change your view for it from the settings menu.
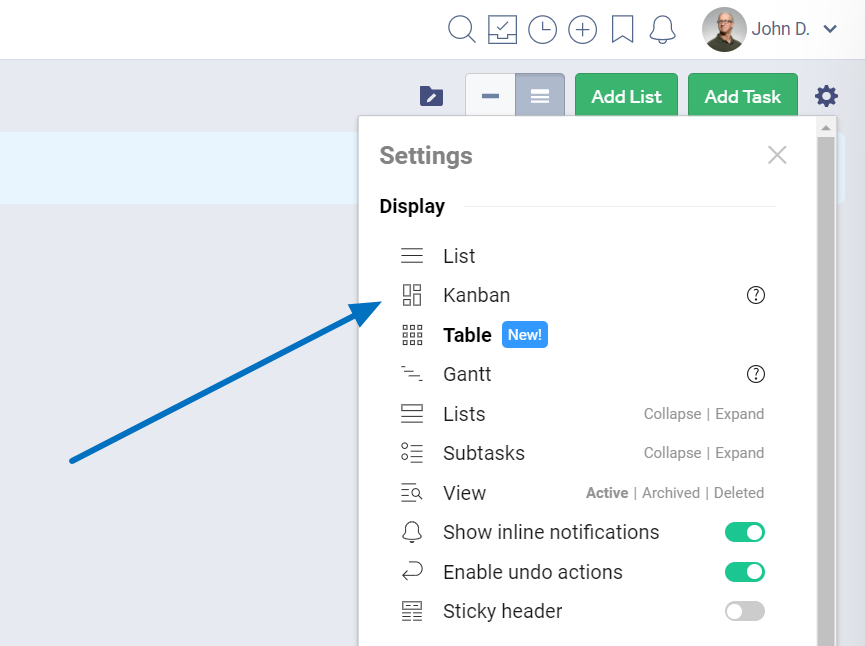
Gantt
Gantt view is more complex than List view and Kanban view, so we created its own documentation article.
Table
Please see this documentation article for a guide on using table view.
Kanban
Changing detail levels in Kanban
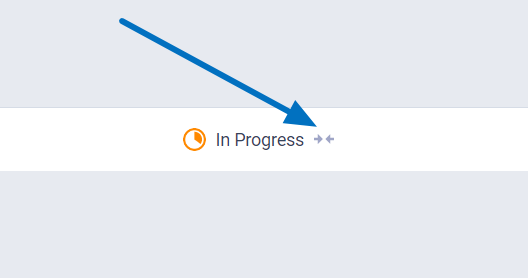
Kanban view has 3 detail levels that you can switch between, modifying the size of the task cards.
Expand and collapse Kanban columns
All three Kanban columns can be expanded and collapsed by clicking on their header. Collapsing a column shrinks it, thus enlarging the remaining two columns.
note: If all your tasks have suddenly become narrow, it means that you accidentally collapsed all three columns. You only need to click on each column’s header again to restore to the standard size.
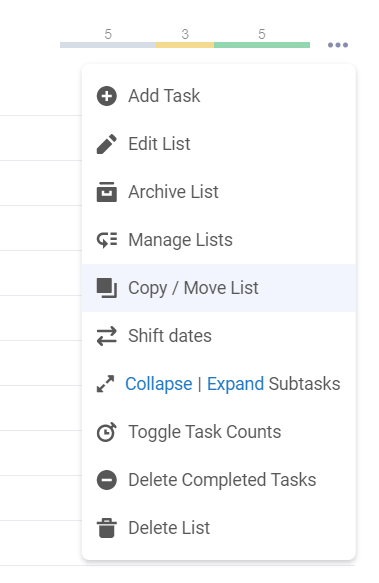
Task Lists
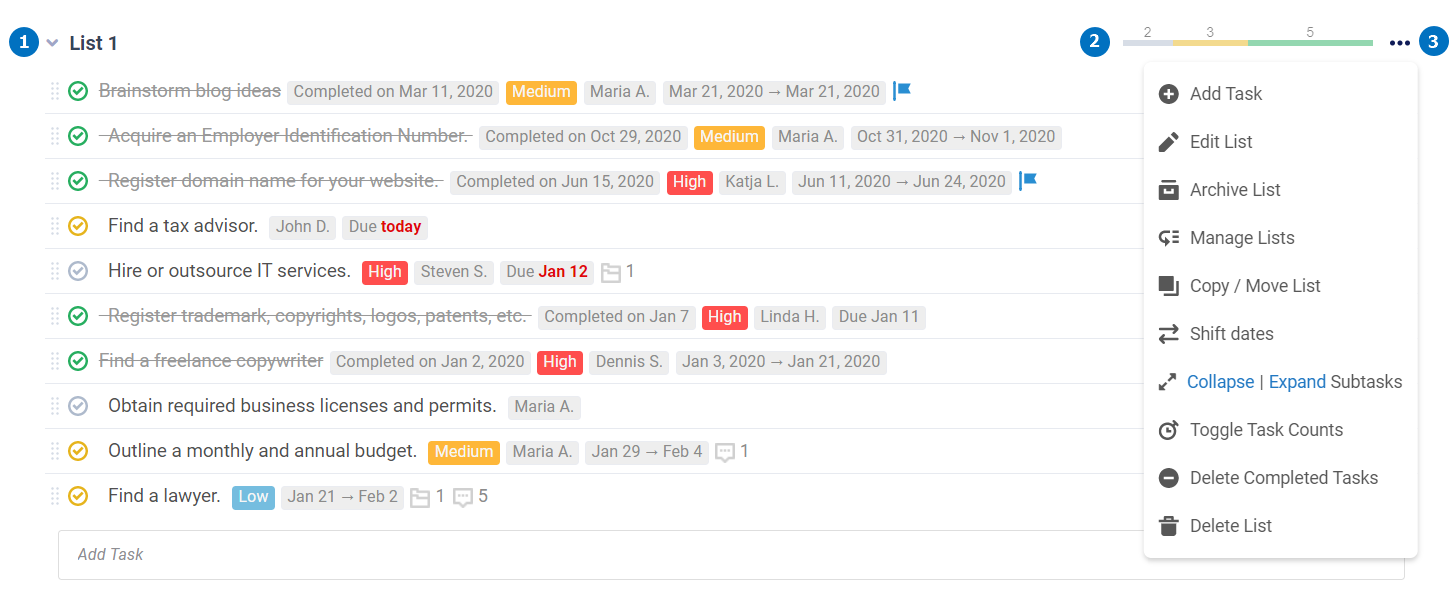
Tasks can be organized into different task lists, which can be expanded and collapsed from the icon to the left of their name(1). Each Task List has a mini-report (2) next to it that shows the number of not started, in progress, and completed tasks.
Clicking the 3-dot icon (3) to the right of a task list will show multiple options: Add Task, Edit List, Archive List, Manage Lists, Copy/Move List, Shift Dates, Collapse | Expand Subtasks, Toggle Task Counts, Delete Completed Tasks, Delete List.
Archive Task Lists and their Tasks
The option to archive a task list is in the 3-dot menu on its right. note: We only allow archiving task lists and all the tasks in them, not the archival of single tasks.
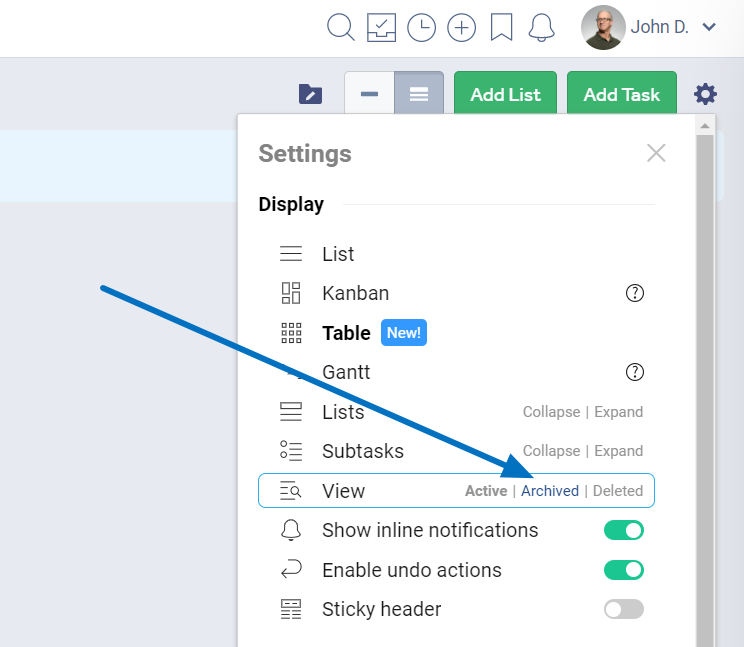
To see all archived task lists, click the cogwheel icon and select “View: Archived"
Assigning tasks and subtasks to multiple assignees
Please check the Multiple Assignees module available on all paid plans.
Creating identical subtasks for multiple users
On the paid plans, you can automatically create identical to the higher-level task subtasks individually assigned. This can only be done when creating a task or a subtask, not when editing it. Go to the Notify section(1) on the task creation form, select the users you want and click the button on the right(2). After saving the task, our system will create a subtask assigned to each user in the Notify section. The subtasks will have the same title, priority, custom fields values, and start/due dates as their parent task. The task’s description and attachments will not be copied over.
note: In order for the subtasks to be created, the users need to have a permission level above Guest and Read-Only. If you add 5 people to the Notify section: 1 Guest, 1 Read-Only, 2 Users, and 1 Pro User, we will create 3 subtasks, not 5.

Recurring Tasks
Recurring tasks (and recurring Calendar events) are only available on our paid plans. To make a task recurring, turn on the Repeat slider when creating or editing it.
A task will be created for each recurrence. The recurrences will have the same title as the original task, and the same description, attachments, and people following it. Comments and their attachments are not copied over. note: If your task has attachments, creating the recurrence will take a few minutes and you will get an email when it is created.
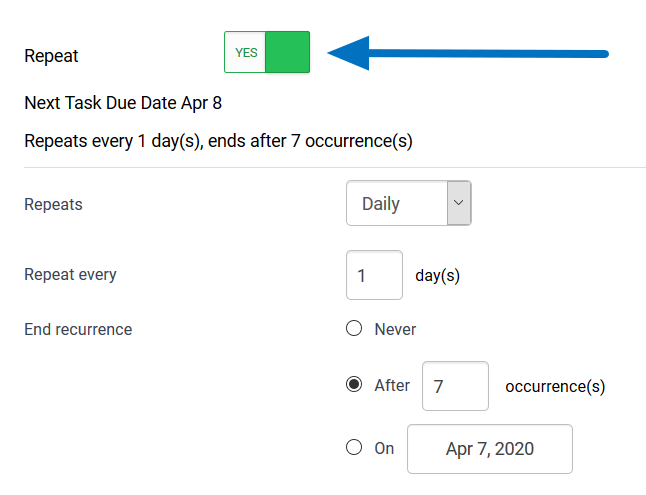
If you'd like to edit the recurrence settings or stop the cycle, you will need to edit the head task, which is usually the latest one in the series and has a refresh icon next to its name.
You will be able to see the upcoming recurring tasks in the Calendar, Daily Recap, Homepage and receive an email notification for a person assigned to the new task being created.
There are some limitations:
- You can not create a recurrent subtask in a recurrent task
- You can not make a task recurrent if it already has a recurrent subtask
We create recurring tasks 7 days in advance. The reason we don’t create all of them at once is that it would crowd up your task list unless you created specific filters to hide future tasks. Please check this blog post for more info.
But if you'd like them to be created sooner, there's the option to generate the next recurrence on the page of the original recurring task.
Shift Dates
You can shift the start and end dates of your tasks by clicking the 3-dot icon of a task and selecting Shift Dates. Doing this to a task will also change the dates of its subtasks.
Shift Dates can also be done at the task list level from the task list's 3-dot menu, and at the project level from the cogwheel icon. There's also the option to choose which tasks you shift the dates of by using the Bulk Edit function at the top of the page.
Enter a positive value in the Days Offset field if you want your tasks to be done later, or a negative one if you want them to be done sooner.
By default, shift dates will only target tasks that are not started, but you can change this on the form.
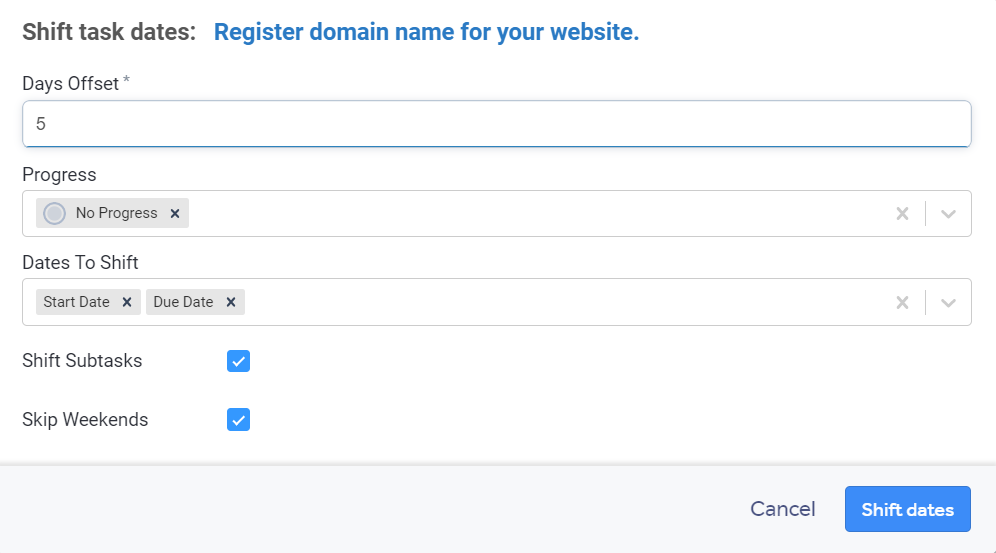
You can also set deadlines based on the start/due date and a known duration on the Business and Enterprise plans. Learn more about this functionality here.
Copy/Move tasks and task lists
On our paid plans, you can copy/move tasks between task lists(including ones in different projects), and copy/move entire task lists between projects.
This function can be used by an account owner, project group, and project administrators, as well as Pro Users. If some projects are not shown on the copy/move form, it means you don't have the required permissions to copy/move to it or they belong to another Freedcamp account. note: Tasks cannot be copied or moved across accounts - both the source and the destination project must be owned by the same Freedcamp account.
The copy/move function can be accessed from a task's 3-dot menu, or from a task list's 3-dot menu.
You'll be able to select the destination project and task list. For tasks, you can also select if you want their subtasks to be copied or moved.
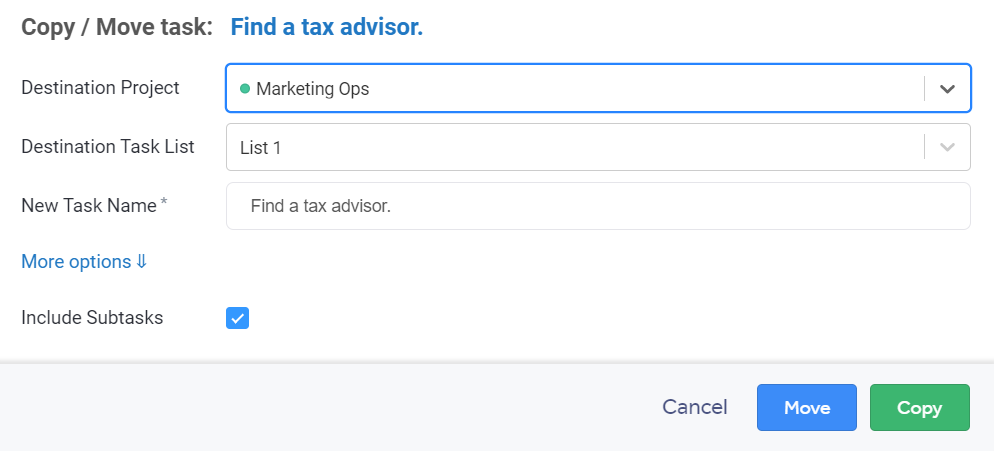
note: If a copied/moved task contains no files attached to it or to its comments, it will be done instantly. If it contains attachments, Freedcamp will create a background job to copy/move tasks and you will be notified via email when it's done.
Change Task Order
You can easily change your tasks’ order by simply hold and drag them to the order that you require. Please refer to the GIF animated file for more details.
Filters and Searches

The Filters menu allows you to:
1. Search tasks based on text in their titles or descriptions.
2. Sort your Tasks by Priority, Start Date, Due Date, Progress, Date Created, Date Updated, Date Completed, Alphabetical, Set Order. (note: Set Order is the default option and allows you to drag and drop the task in your preferred order)
3. Filter by your tasks by a variety of attributes: Created By, Assigned To, Priority, Progress, Start Date, Due Date, Date Created, Date Updated, Recurrent, Date Completed, Milestone Linked, Availability, Tags. Custom Fields will also show in the Filters menu if you applied them to that project.
4. Save the currently applied filters as a Saved Search. Once saved, the search will show up in the sidebar in the list view. In Kanban view, it will be in the saved searches icon between the Filters icon and the Bulk Edit Icon.
We created one saved filter ‘Hide completed’ which replaces an option we had in our interface for you.
Autogenerated Task Numbers
Freedcamp can't automatically generate task numbers, but there's a workaround using a chrome extension. More info here.
Export XLS
You can export your tasks using our Export XLS feature. This feature works on both the Tasks page and Task Board and allows you to export all tasks or the ones you filtered by.