Custom Fields - Tasks
Introduction
Custom Fields for Tasks are available on our Business and Enterprise plans.
Adding custom fields one by one to each task was boring and frankly, it is already done by other solutions. We decided to concentrate on time-saving while maintaining flexibility and customization.
Here are some highlights:
- No reason to add the same fields over and over to your tasks. Just create a template that contains multiple custom fields and apply it to your existing or new projects with a few clicks.
- Custom Field Templates ensure consistency – the 'Bug' template will always add those five extra fields – preventing users from adding only three.
- Realized you need to add extra value in a drop-down used by 10 projects? We have you covered – simply edit the Custom Field Template in one place and it will apply it to all projects.
- Need to add a lot of extra fields? Add separators to your template to logically separate groups of custom fields for better clarity.
- Dislike order custom fields are showing in tasks – simply go to Custom Fields templates and use drag and drop to rearrange them including separators.
- Custom Fields are supported when you copy a project with Project Templates.
- Custom Fields data are included in Data Backups available on the Business and Enterprise plans.
Freedcamp also offers Custom Fields – Projects available on the Business and Enterprise plans.
Permissions
An account owner only can:
- Enable/disable the 'Custom Fields' module
- Create, edit or delete Custom Field Templates for Tasks in Manage SystemCustom Fields & StatusesCustom Fields - Tasks. Project Group administrators can manage the templates of the account owners whose groups they administer as well.
Project Group administrators can add or remove Custom Field Templates when a project is created or edited.
Custom Fields can be applied to a task in a project by all users with permission to add or edit a task.
All users who can edit a task can set and update values for a Custom Field Template in that task.
How It Works
Enabling the Custom Fields Module
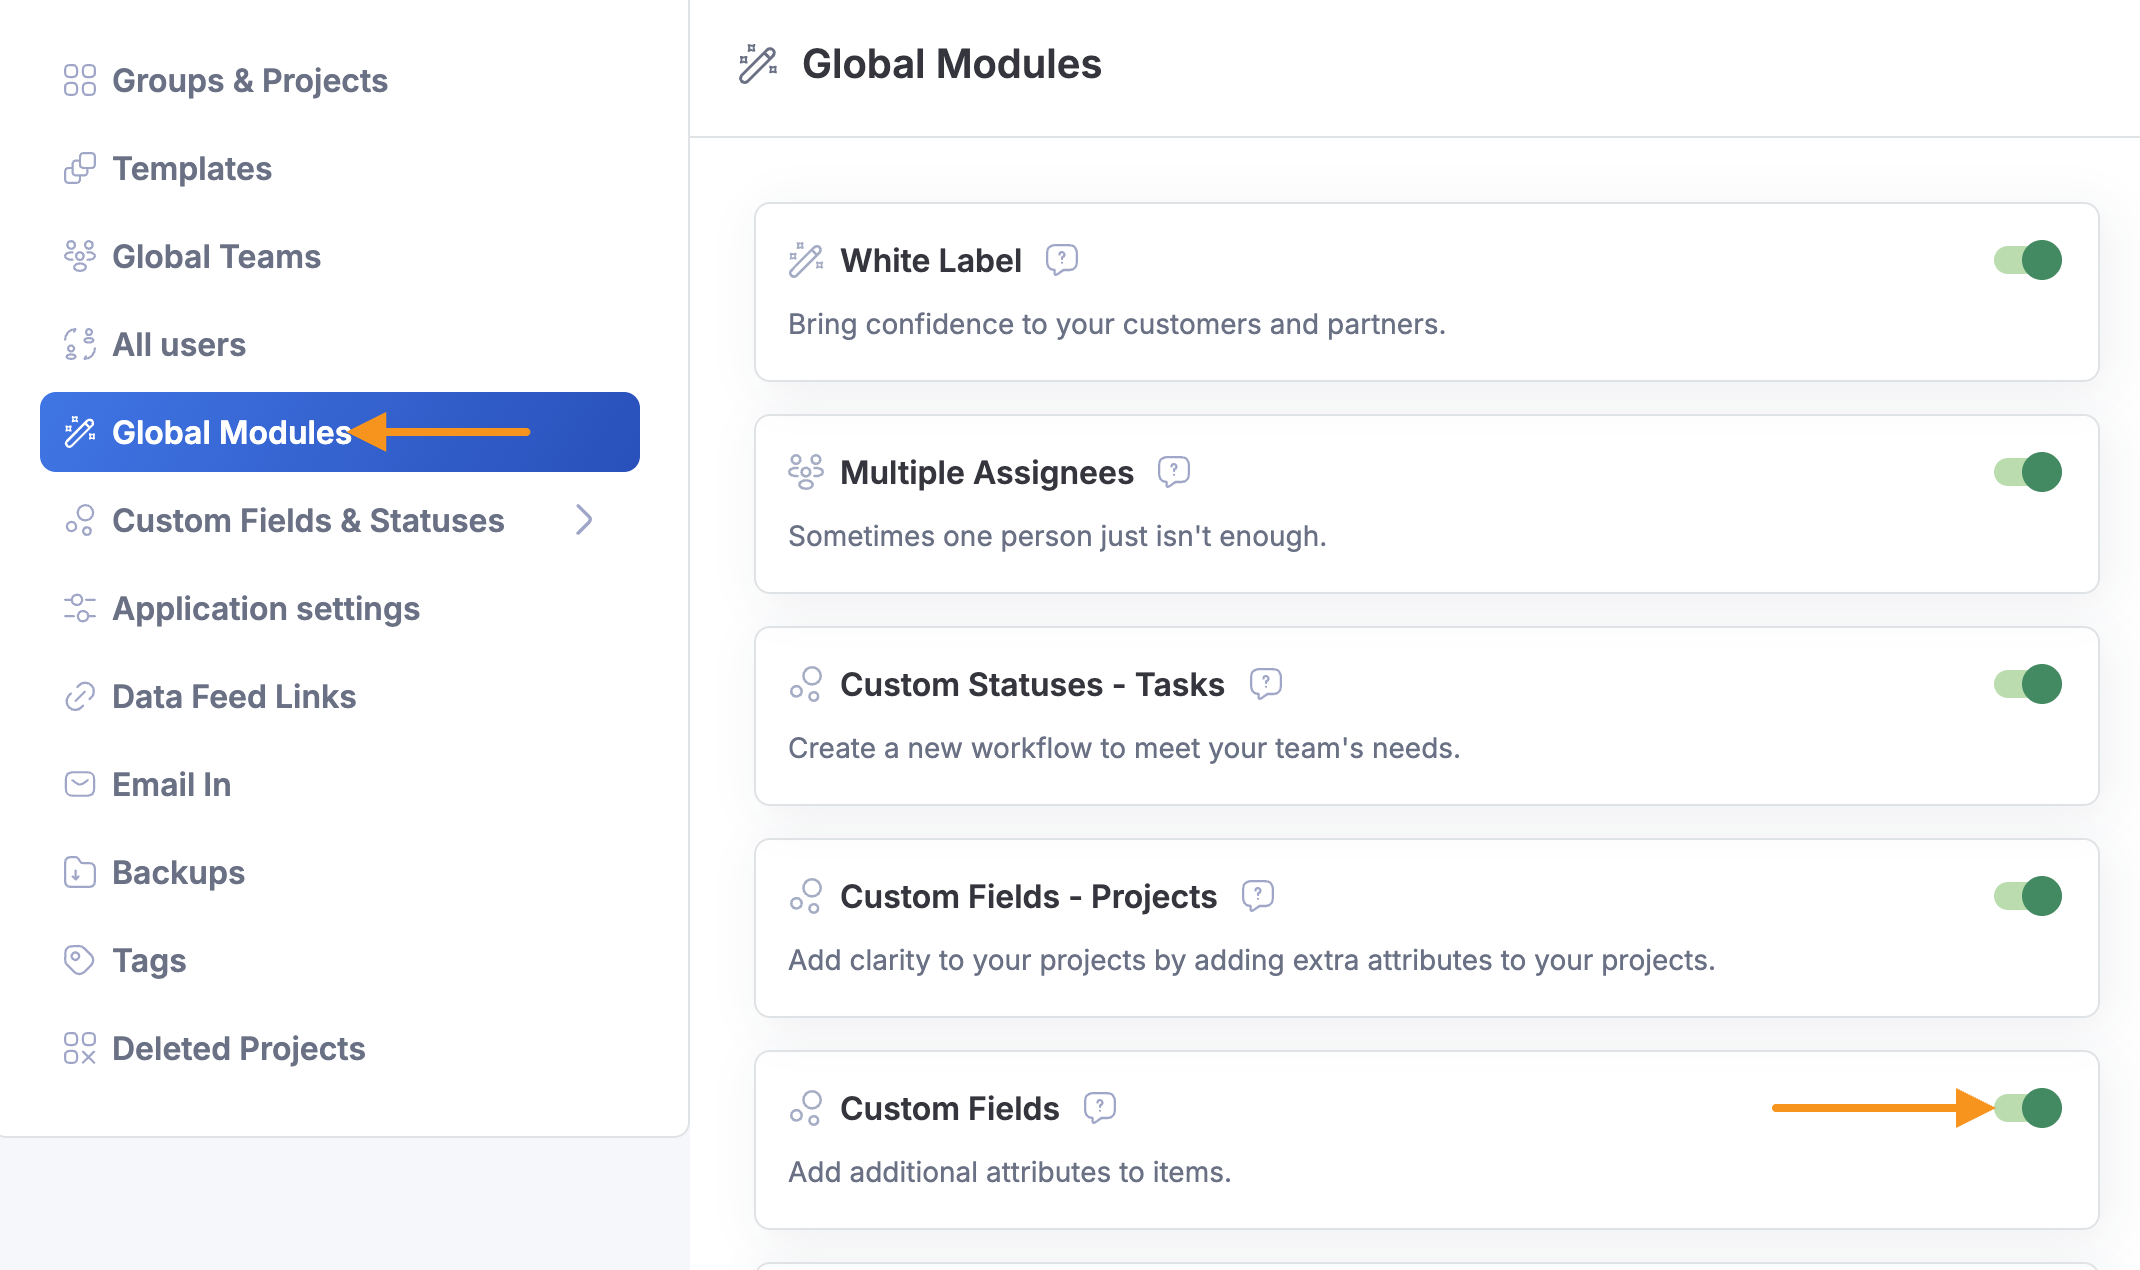
The first step will be to enable the module. Go to the Manage System page, then to the Global Modules section, and turn the slider for Custom Fields to ON.
Creating Templates
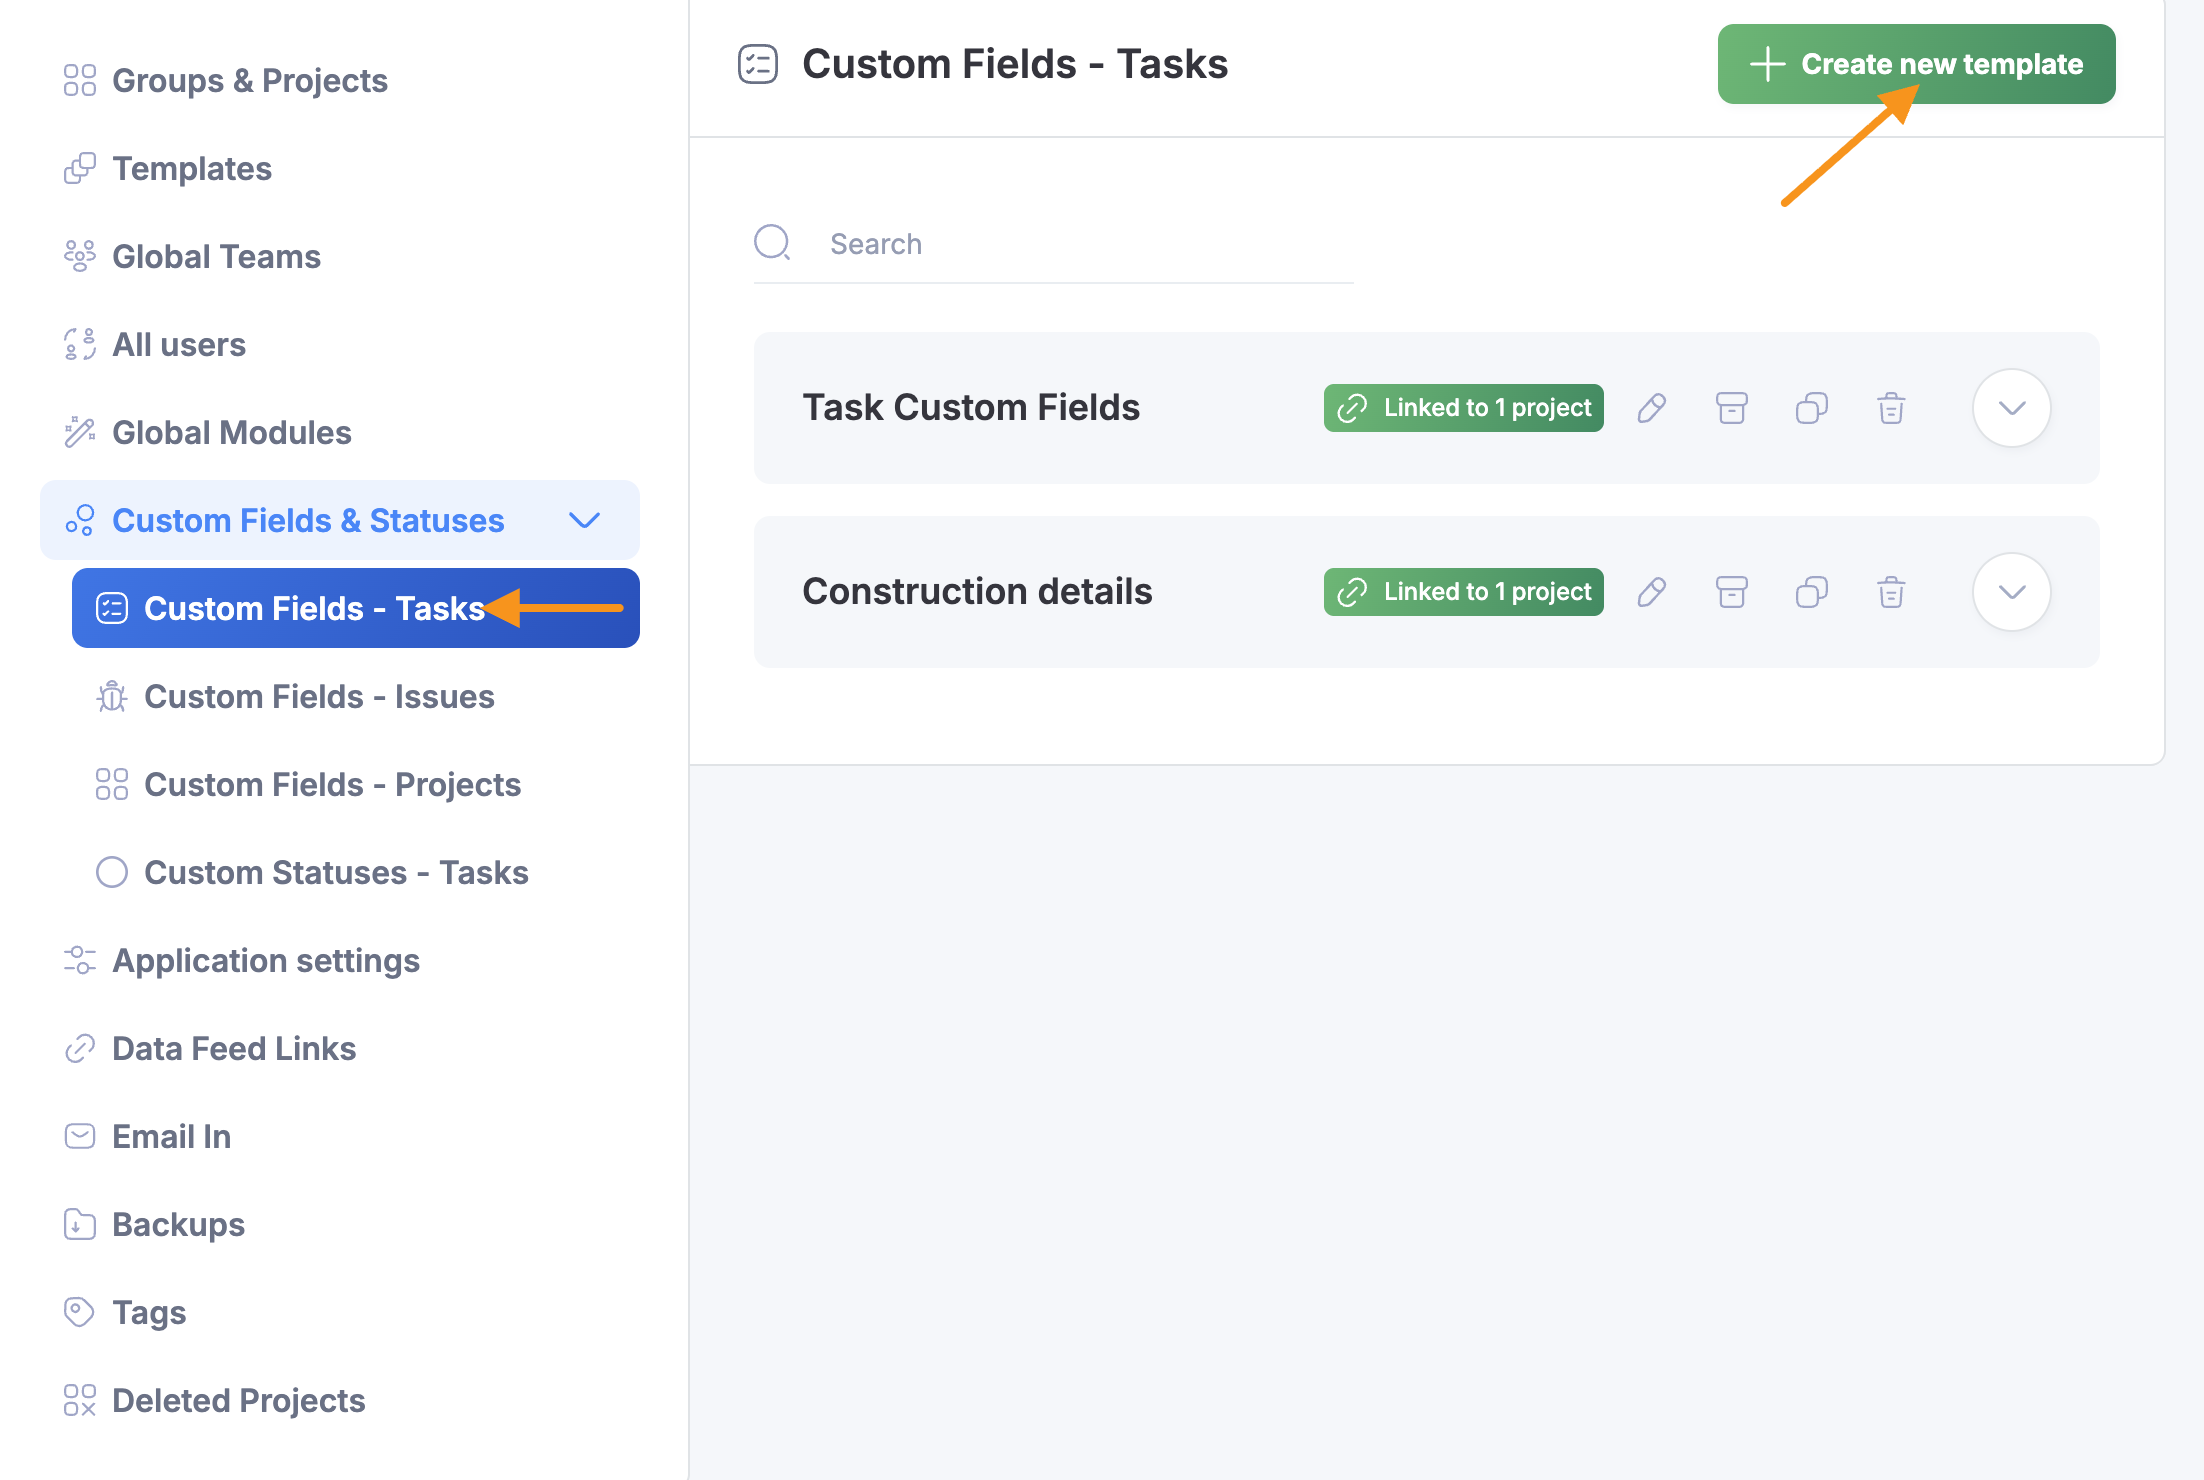
Now you can start creating your Custom Field Templates by going to: Manage SystemCustom Fields & StatusesCustom Fields - TasksClicking on Create new template
We support the following types of custom fields: Text (one line of text), Date, Number, Checkbox (true/false field), Dropdown, Text Area (multi-line text), Currency , and Separator (text and a line that allows you to split multiple custom fields into groups).
Note: When a URL is used inside input or text box fields, it will be parsed and shown as a clickable link. Internal Freedcamp links will be automatically converted to smart links:
Managing Templates

Once you've created templates, you can:
Edit
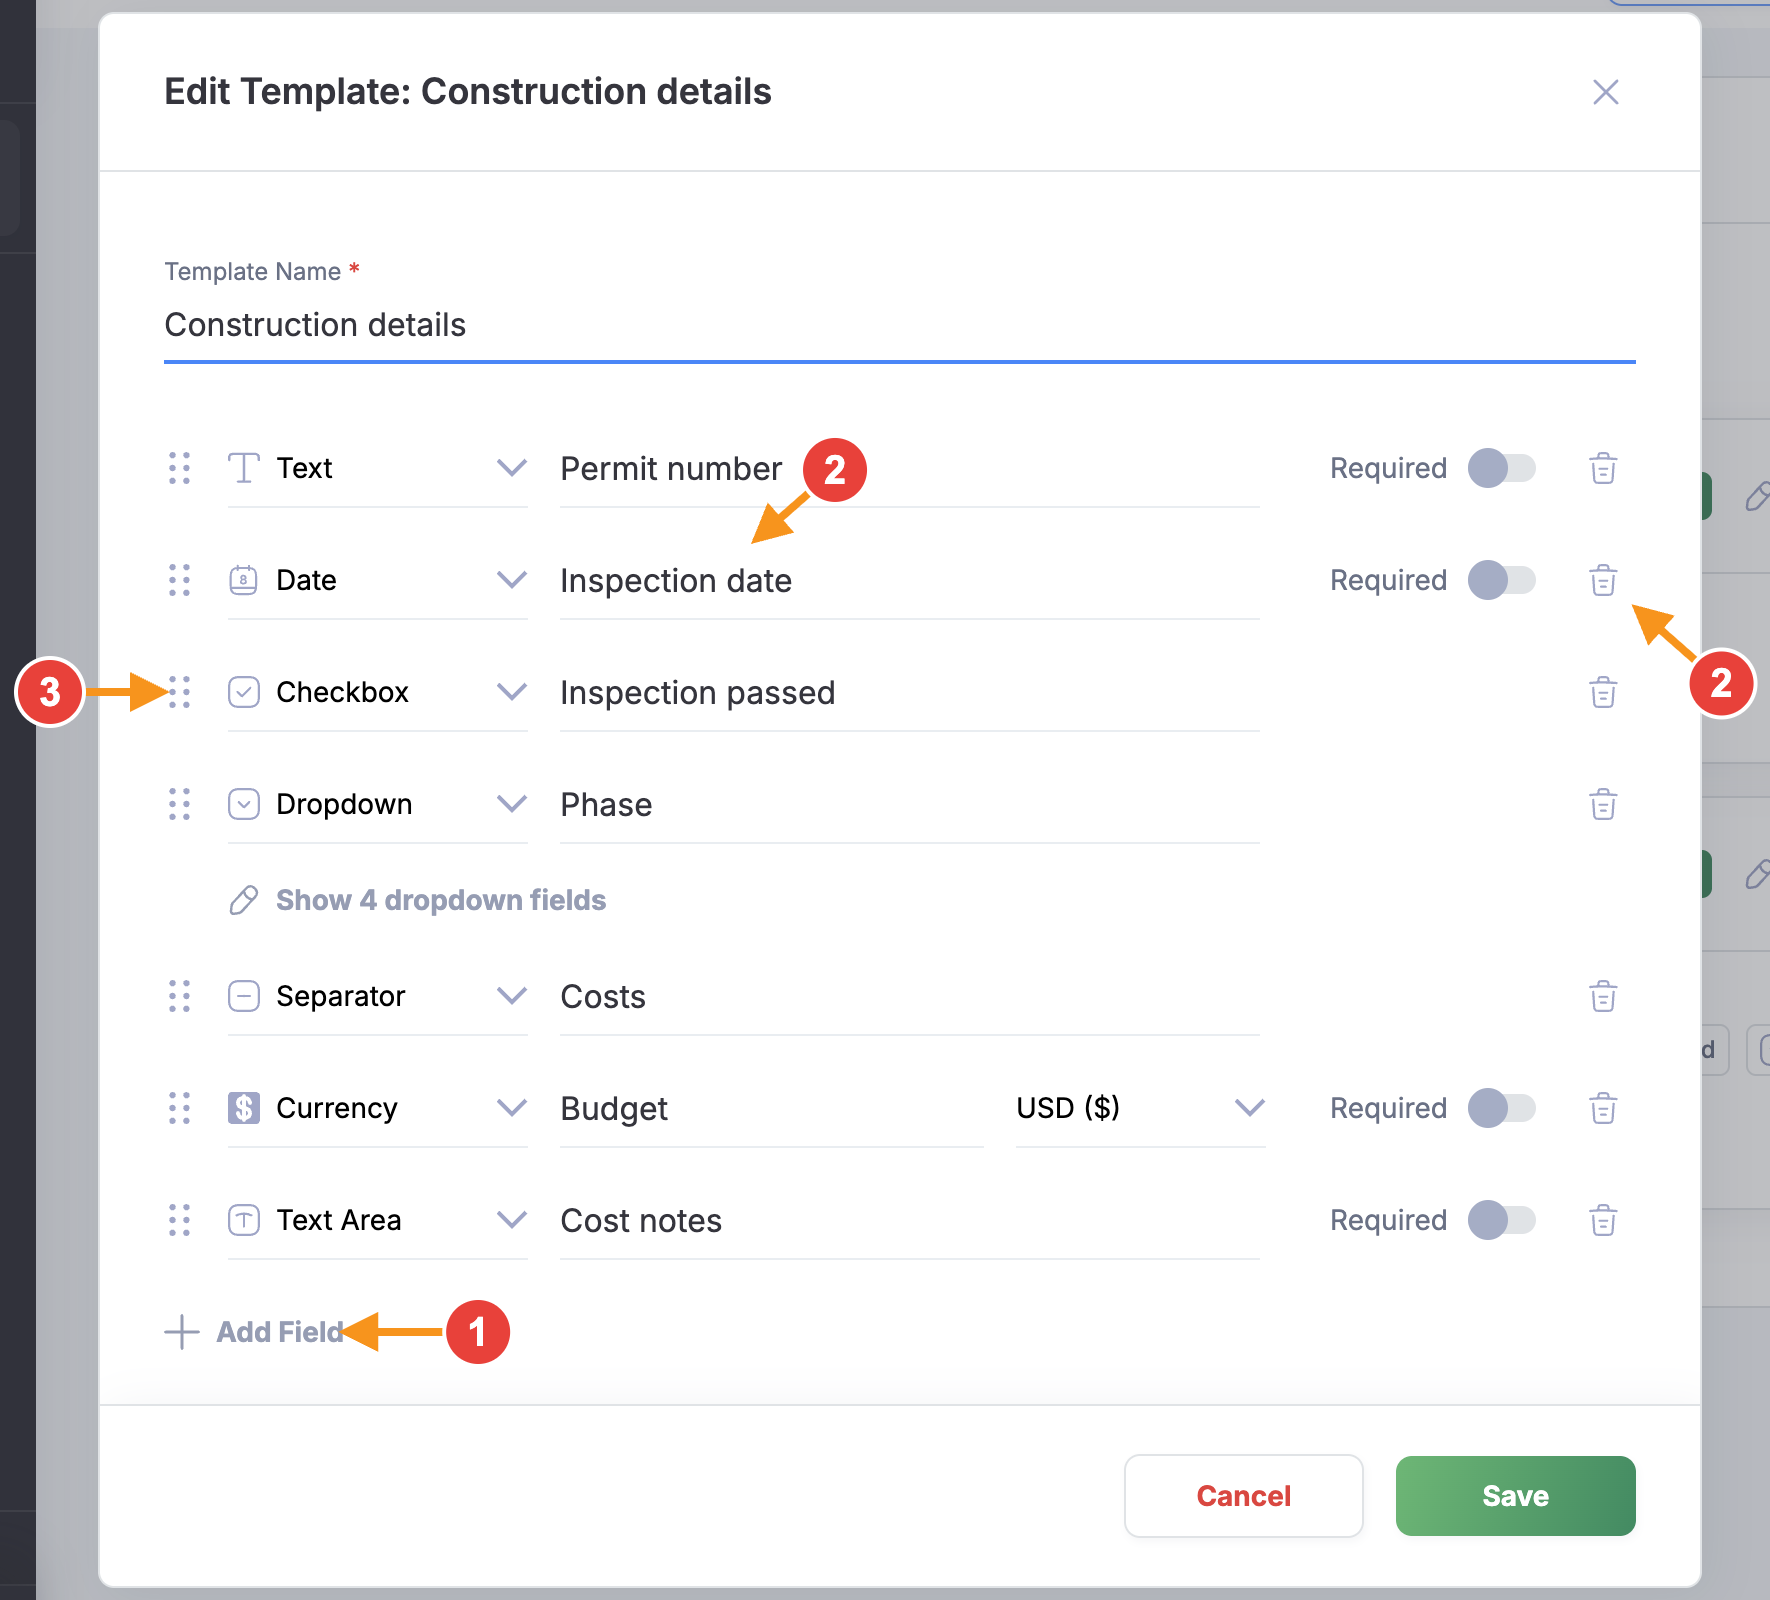
The Edit function allows you to add extra fields(1) to a template, edit/delete current fields(2), as well as change their order(3).
When editing a current field, you'll be able to edit its name and its pre-set values (if it's a dropdown field - click the “Show N dropdown fields” link under it to open them). The type of a saved field can only be changed to a compatible one: Text and Text Area can be swapped, and Date, Number and Currency can be converted to text; Dropdown, Checkbox and Separator fields cannot change type. All field changes are saved together when you click Save on the template.
Note: If you will try to delete the drop-down option that's used in one or multiple projects you will see a warning that Freedcamp will not remove this option until all tasks using this value will be edited and set to another option from this drop-down. It can be done via Tasks Board - select a drop-down custom field and the option you want to remove to see all tasks in all projects using it and edit them to use another value.
Archive
The archive function makes a template not applicable to any new projects, but still active in projects it's already applied to. Ideal for improving current templates without affecting projects that use old versions
Copy
Allows you to duplicate a template. Great for when you want to have similar templates with only a few different fields.
Delete
There is no Bin for custom fields templates like there is for tasks, so only delete a template when you are 100% sure you don't want to use it any more.
Applying Templates to Projects
After custom fields templates are created, they can be applied to projects. This can be done when creating a new project, or when editing an existing one.
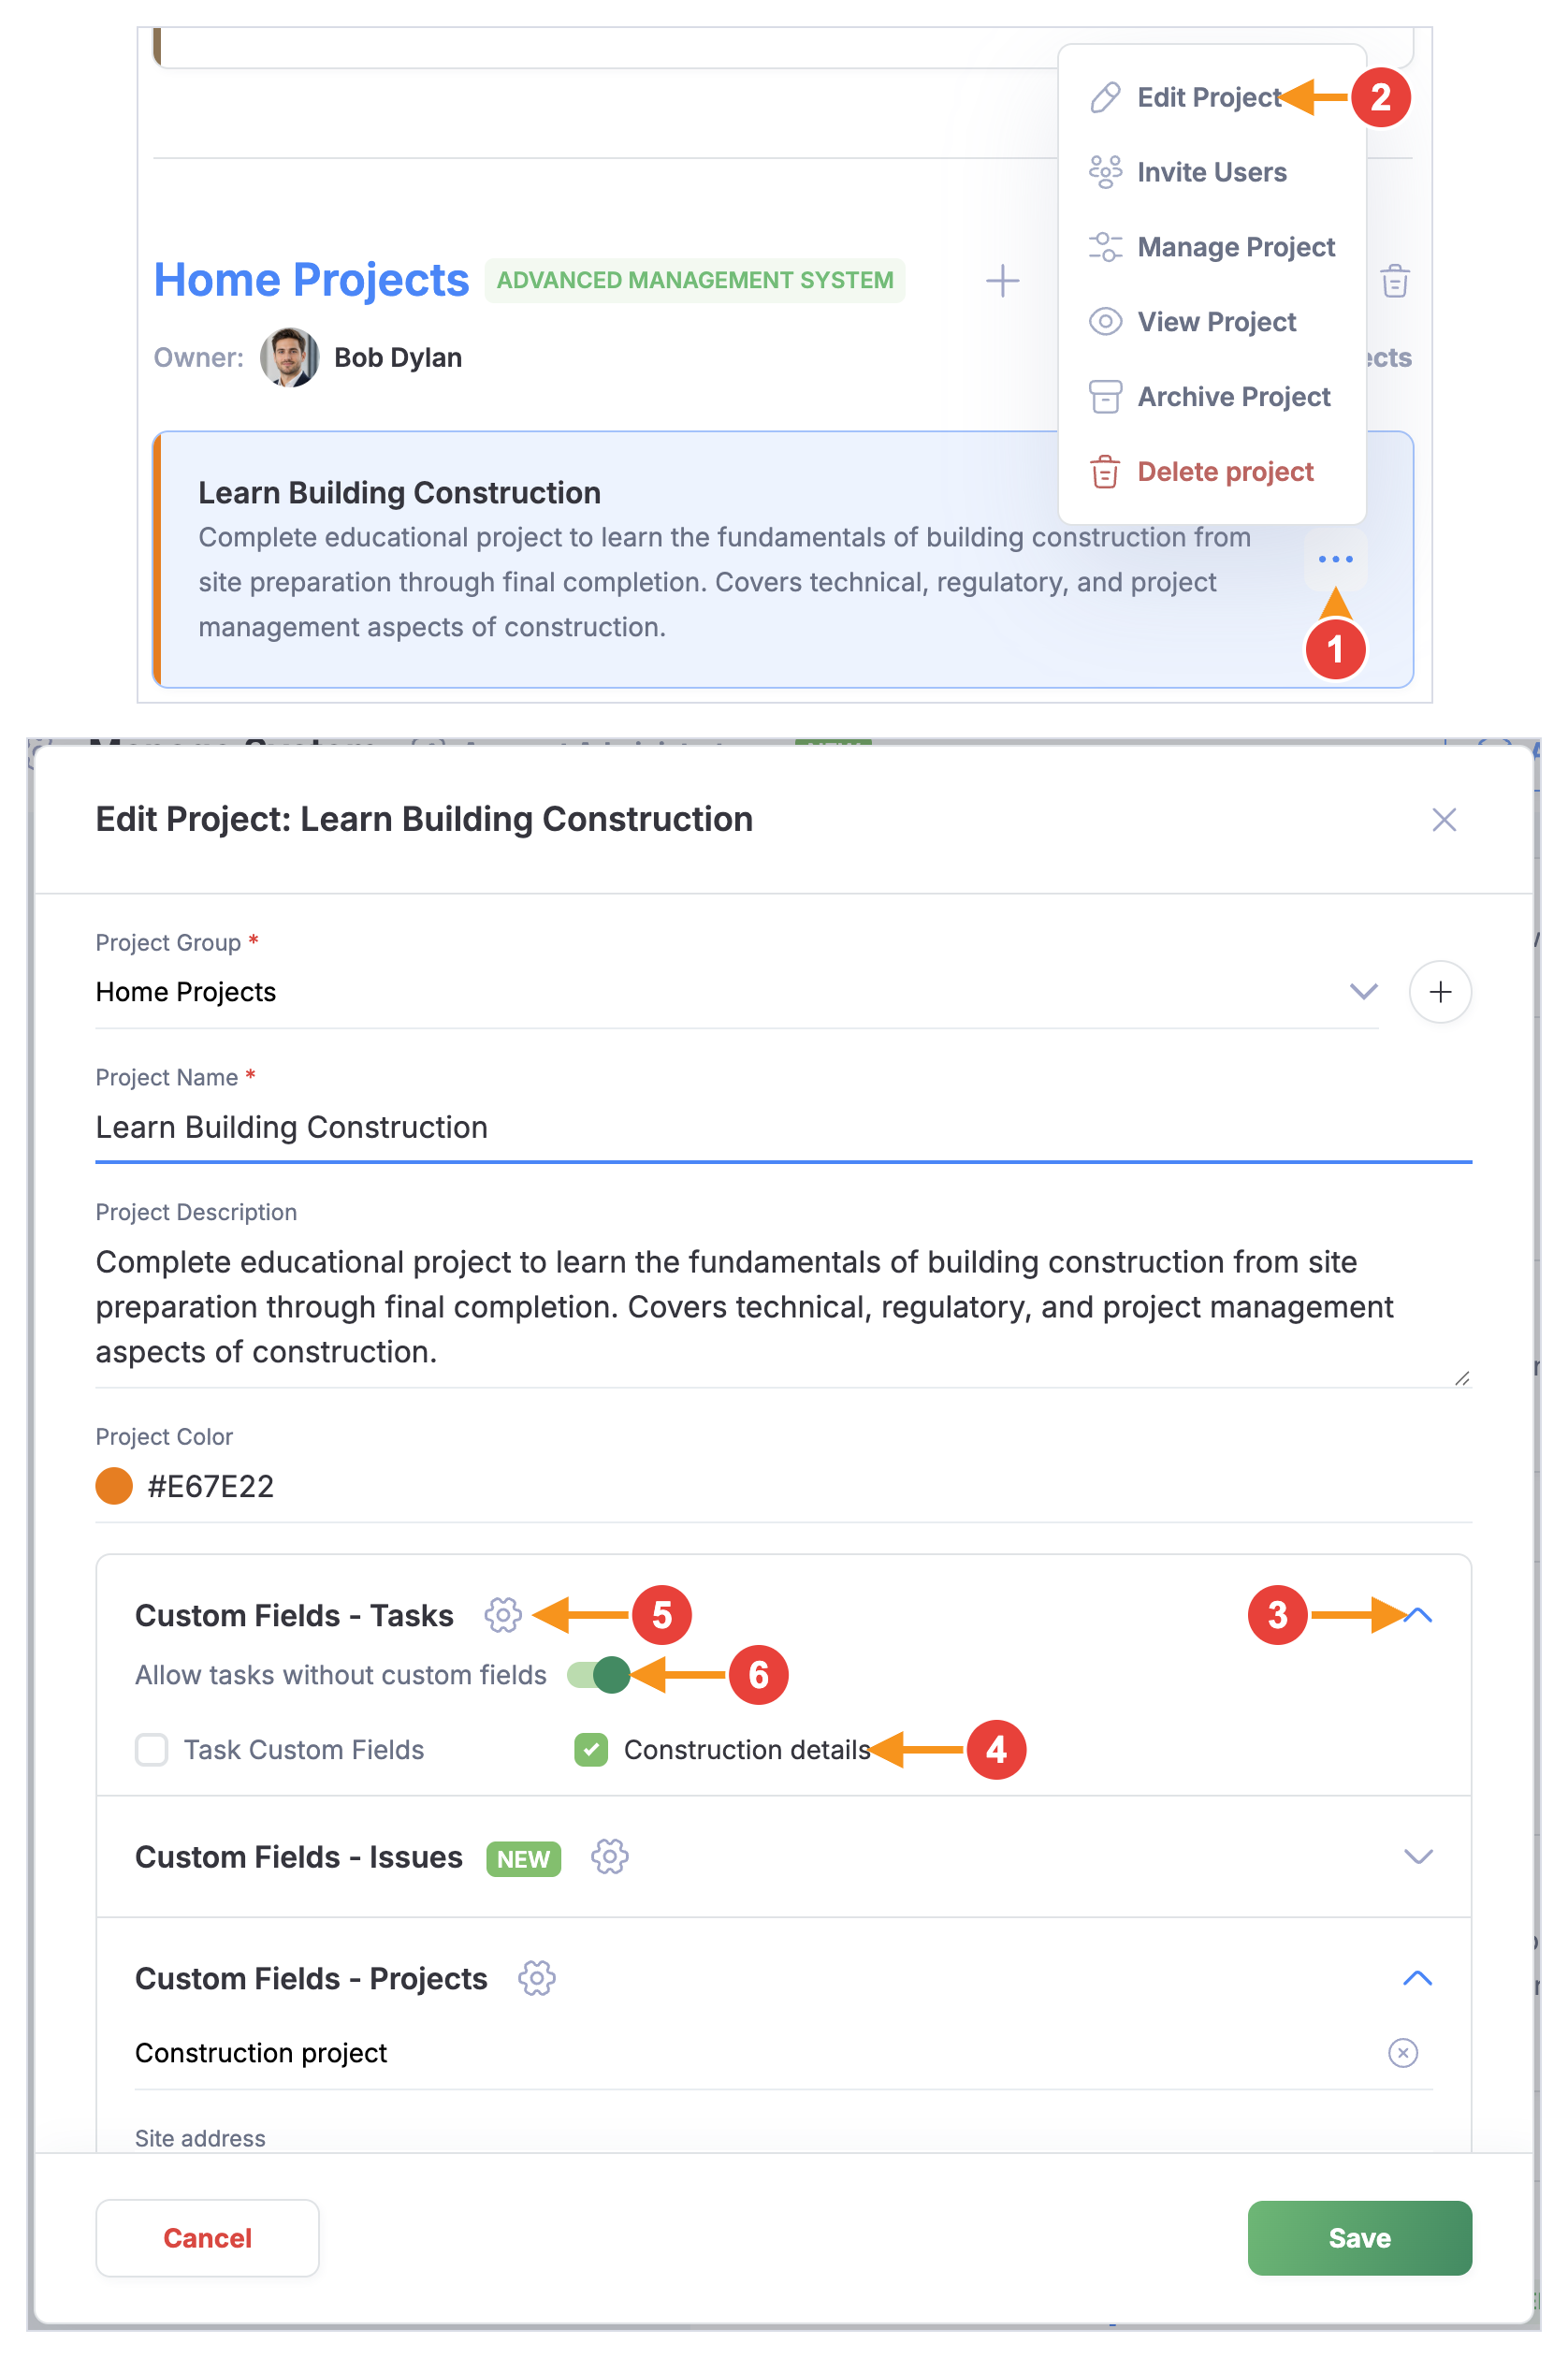
When editing a project(1-2) on the Manage System page, you can apply one or more custom field templates in the “Custom Fields - Tasks” section (3-4). You can also alter them if needed (5). A template can also be applied straight from the Custom Fields - Tasks page in Manage System: click the “Link to projects” tag on its row (it reads “Linked to N project” once the template is in use) and choose the projects.
Note: If a project has multiple templates applied, you can choose which template applies to a task when creating or editing the task. If the project only has one template, it will depend on the option you chose when adding it to a project. It can either be applied to all tasks in the project by default, or it can only be applied to the tasks you want(6).
Showing Custom Fields Inline
Custom fields can be shown and updated on the tasks page, without having to open the task. To enable this option, open the Tasks settings menu, choose Display fields (Display columns in the Table view), select the custom fields you want to be shown and save. In the Display fields dialog a selected custom field is listed as “[Template name] Field name”, and on the tasks page its value is shown after the task title as a “Field name | value” label.
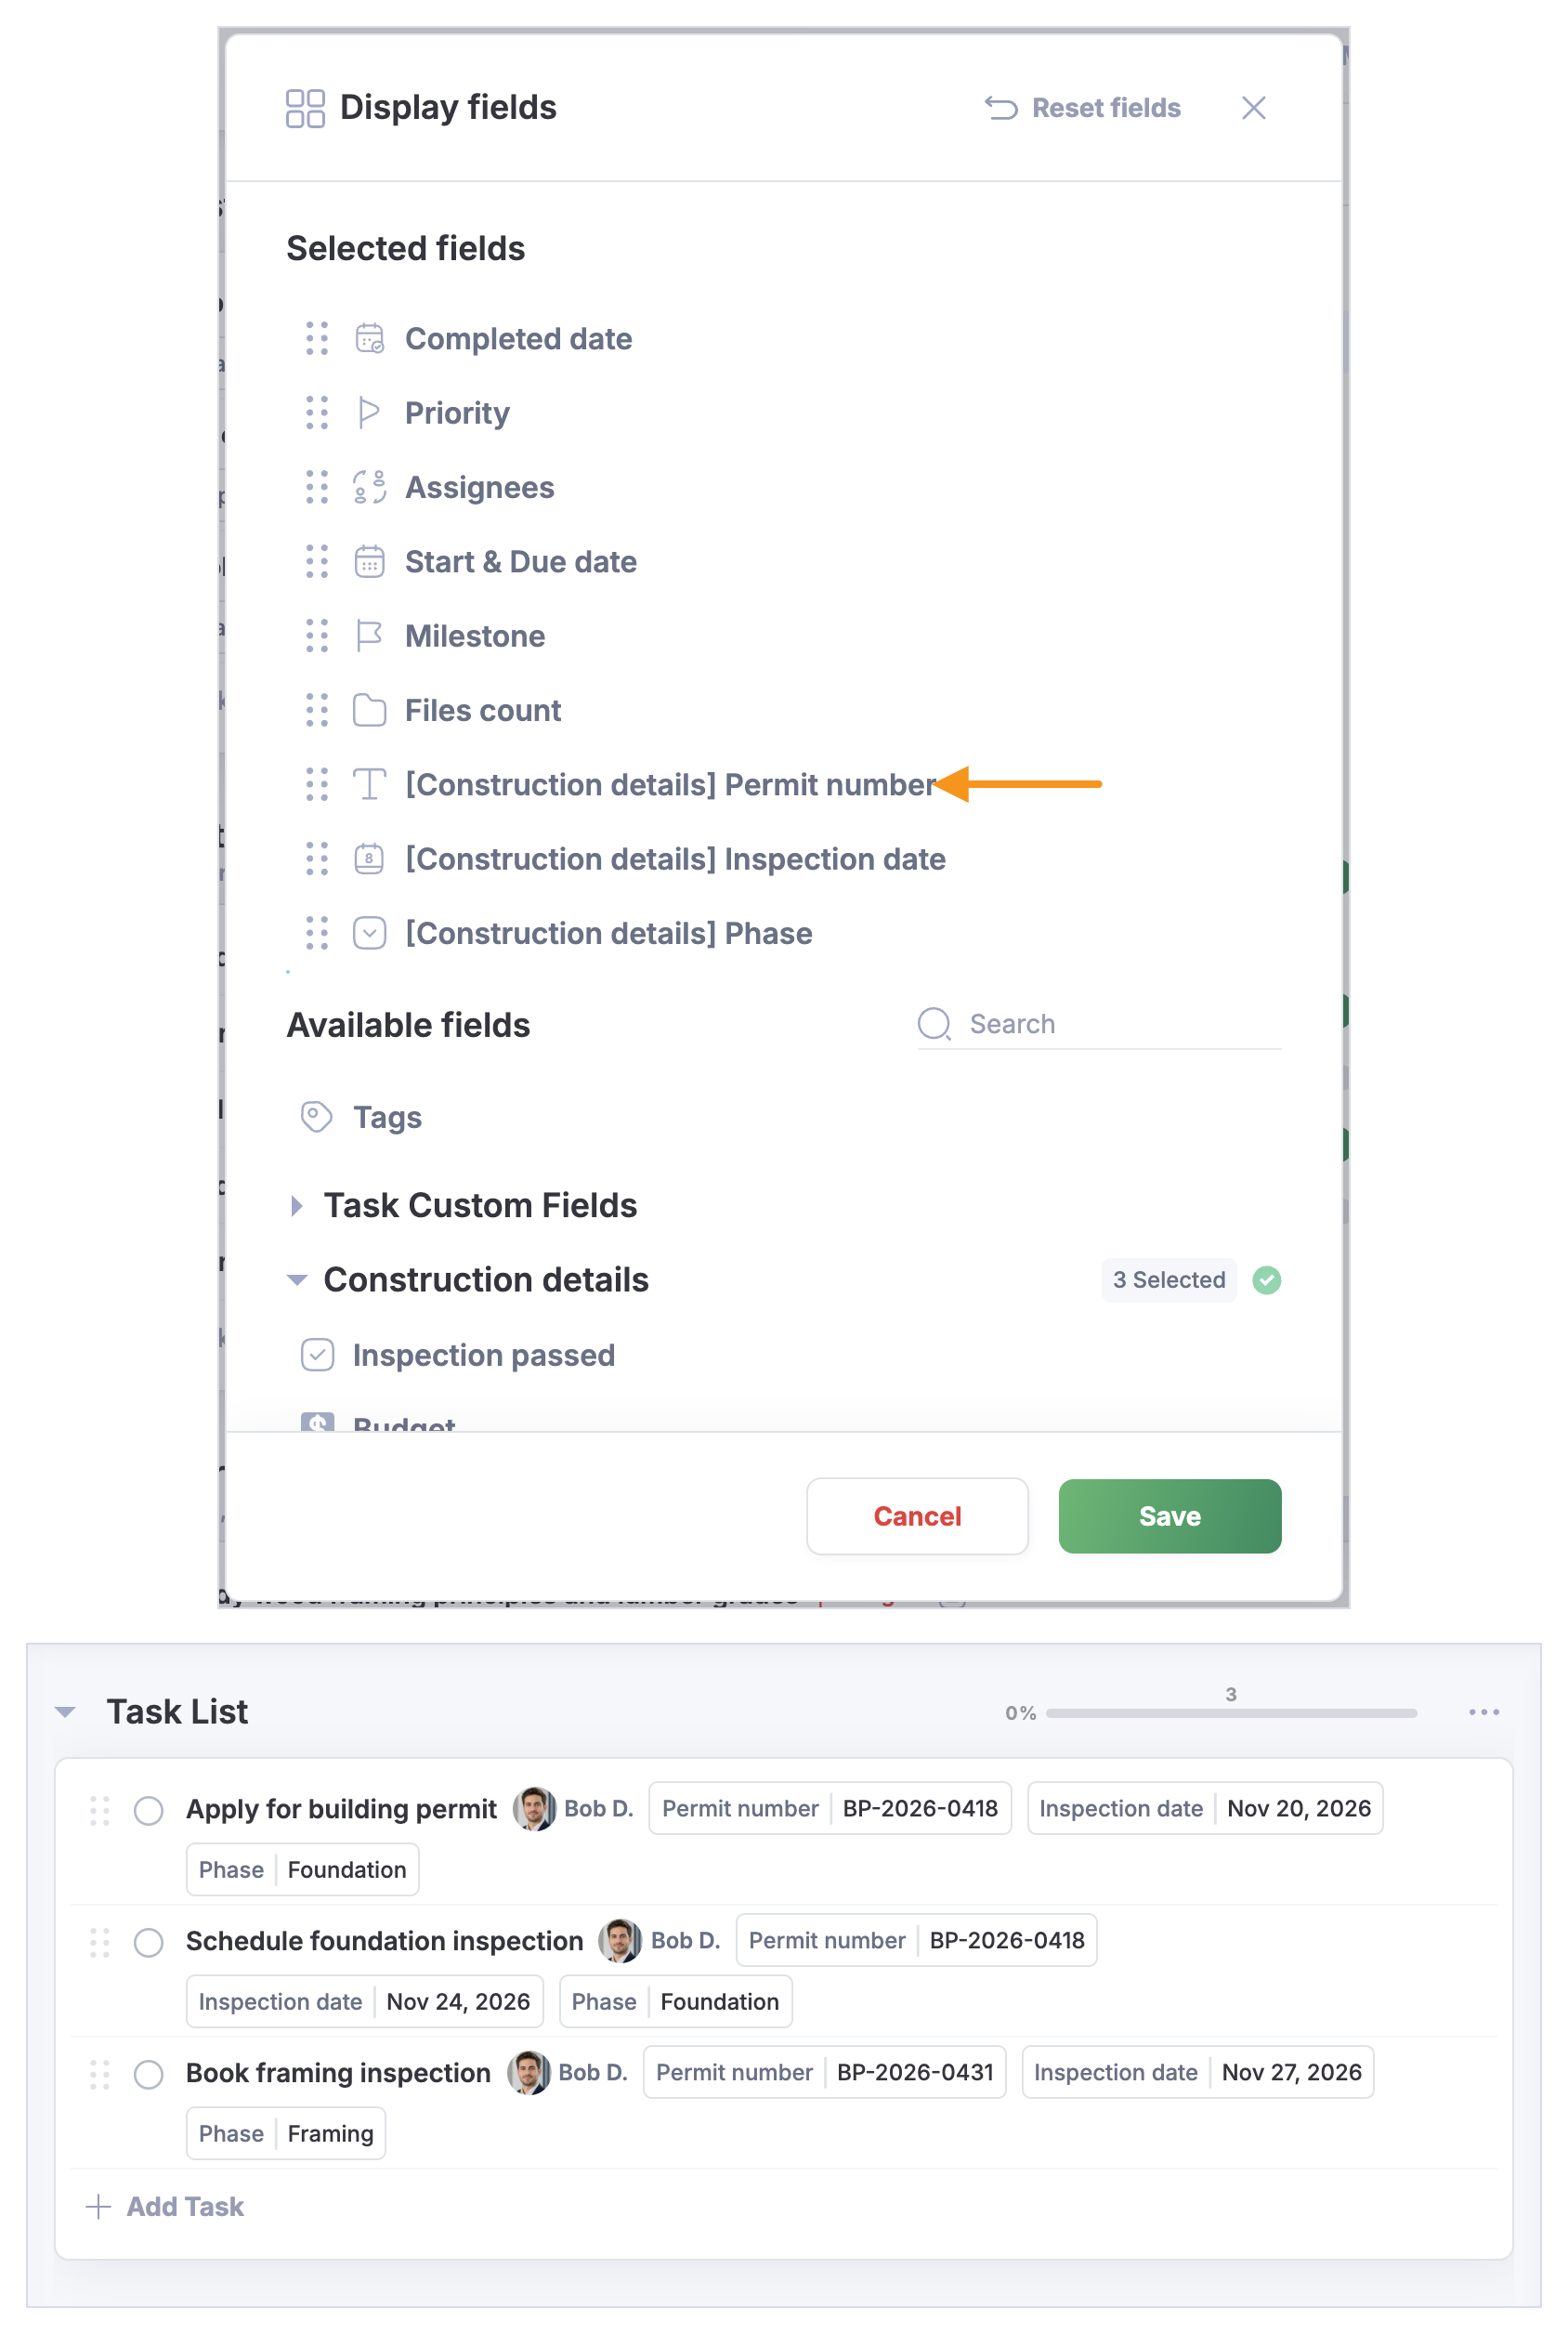
Note: The field will only be shown if its template is connected to a task. For example, if when applying the custom fields template to the project you enabled the option "Allow tasks without custom fields", or you applied multiple templates to the project, the field will only show inline if its template is selected for that task.
The Final Result
You can see two Custom Field Templates created:
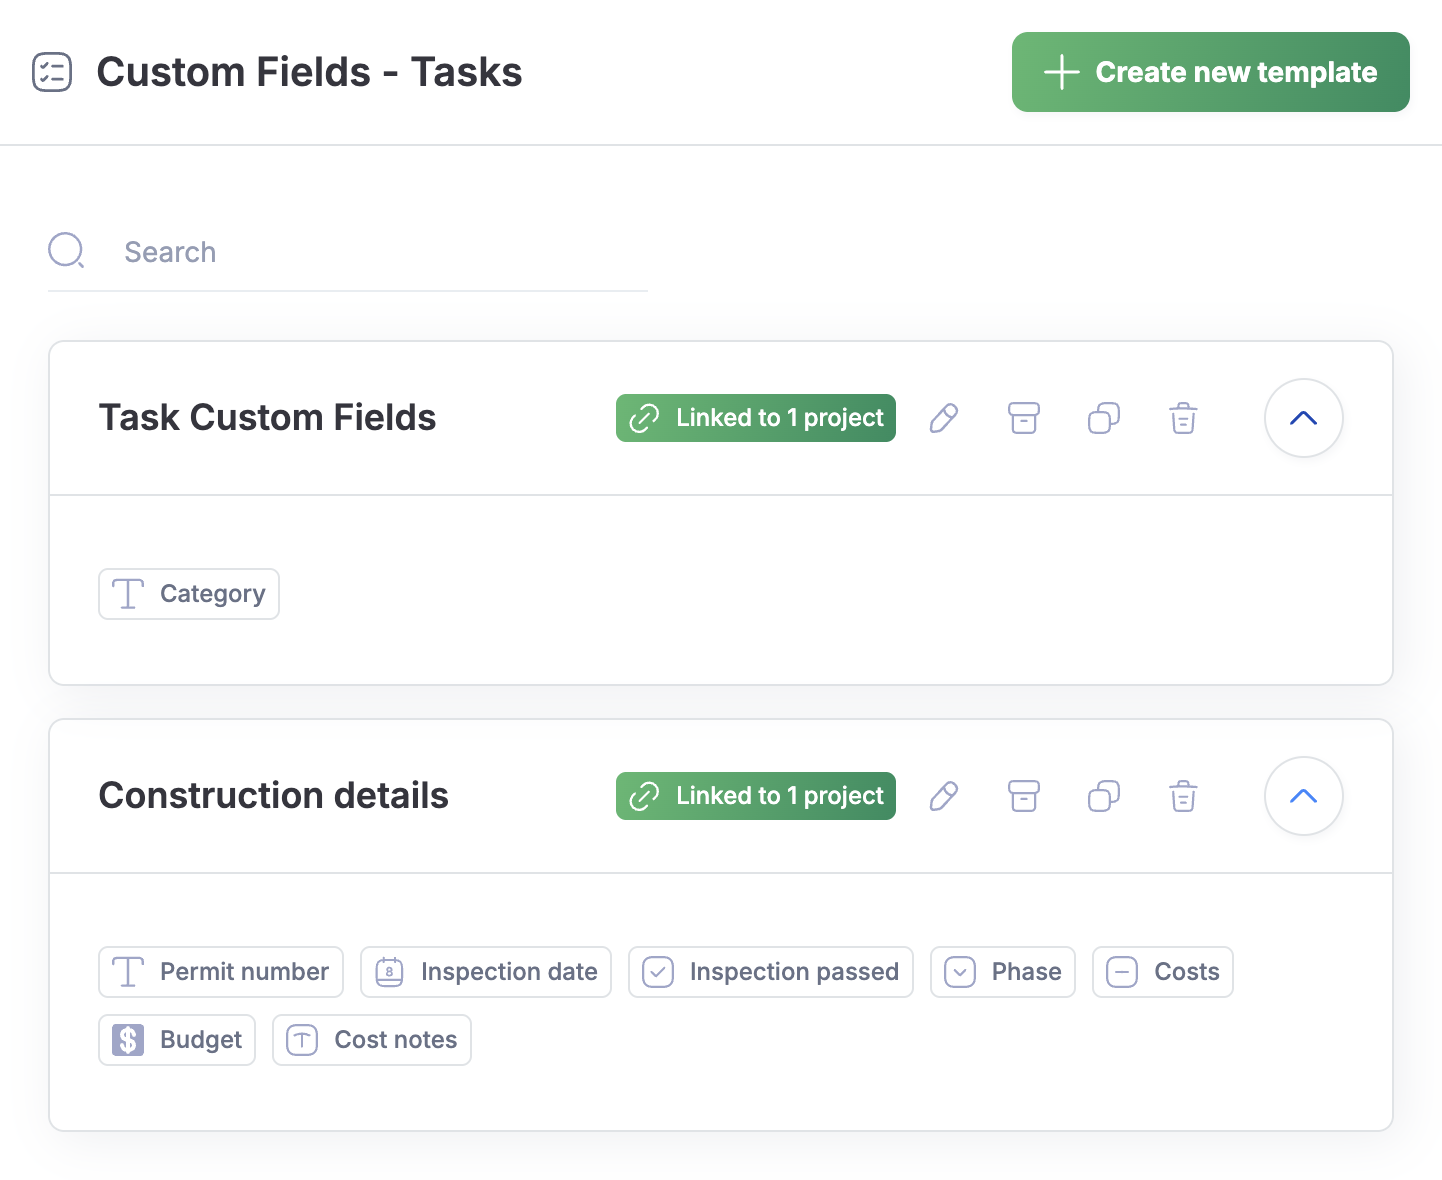
Each of these has its own set of fields, listed under the template's name when it is expanded.
Once you apply one or more Custom Field Templates to a project, you have extra control allowing you to apply them to your tasks: pick the template in the “Custom Fields” section of the task form (when “Allow tasks without custom fields” is switched on for the project, the selector also offers “None”).
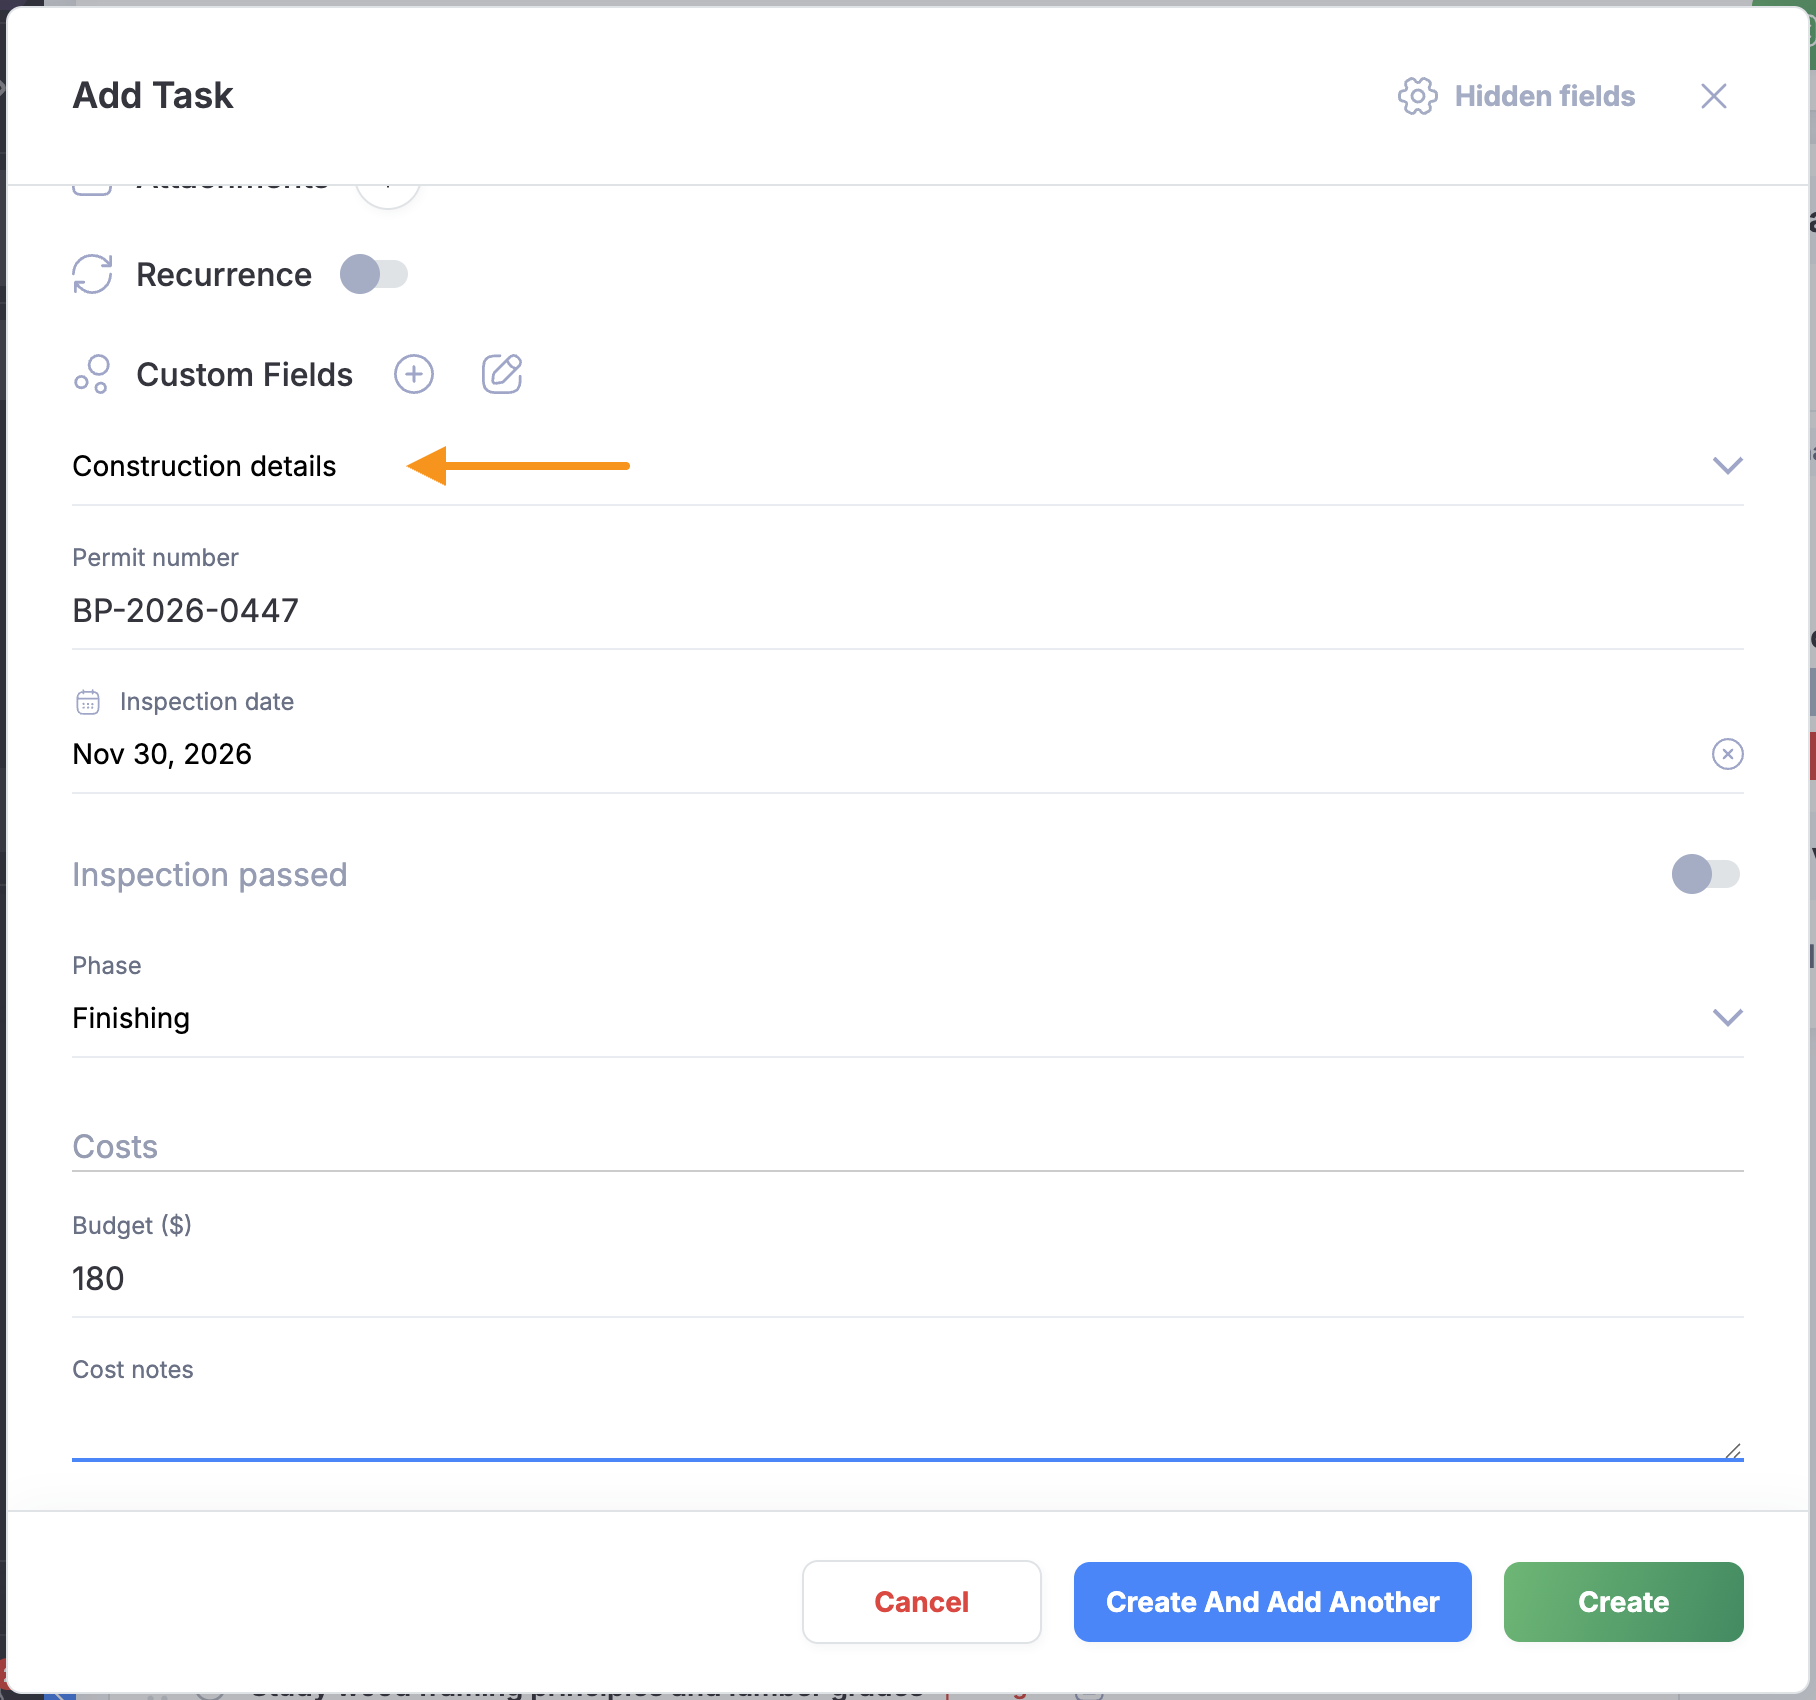
Here is an example of a task with new Custom Fields applied and set:
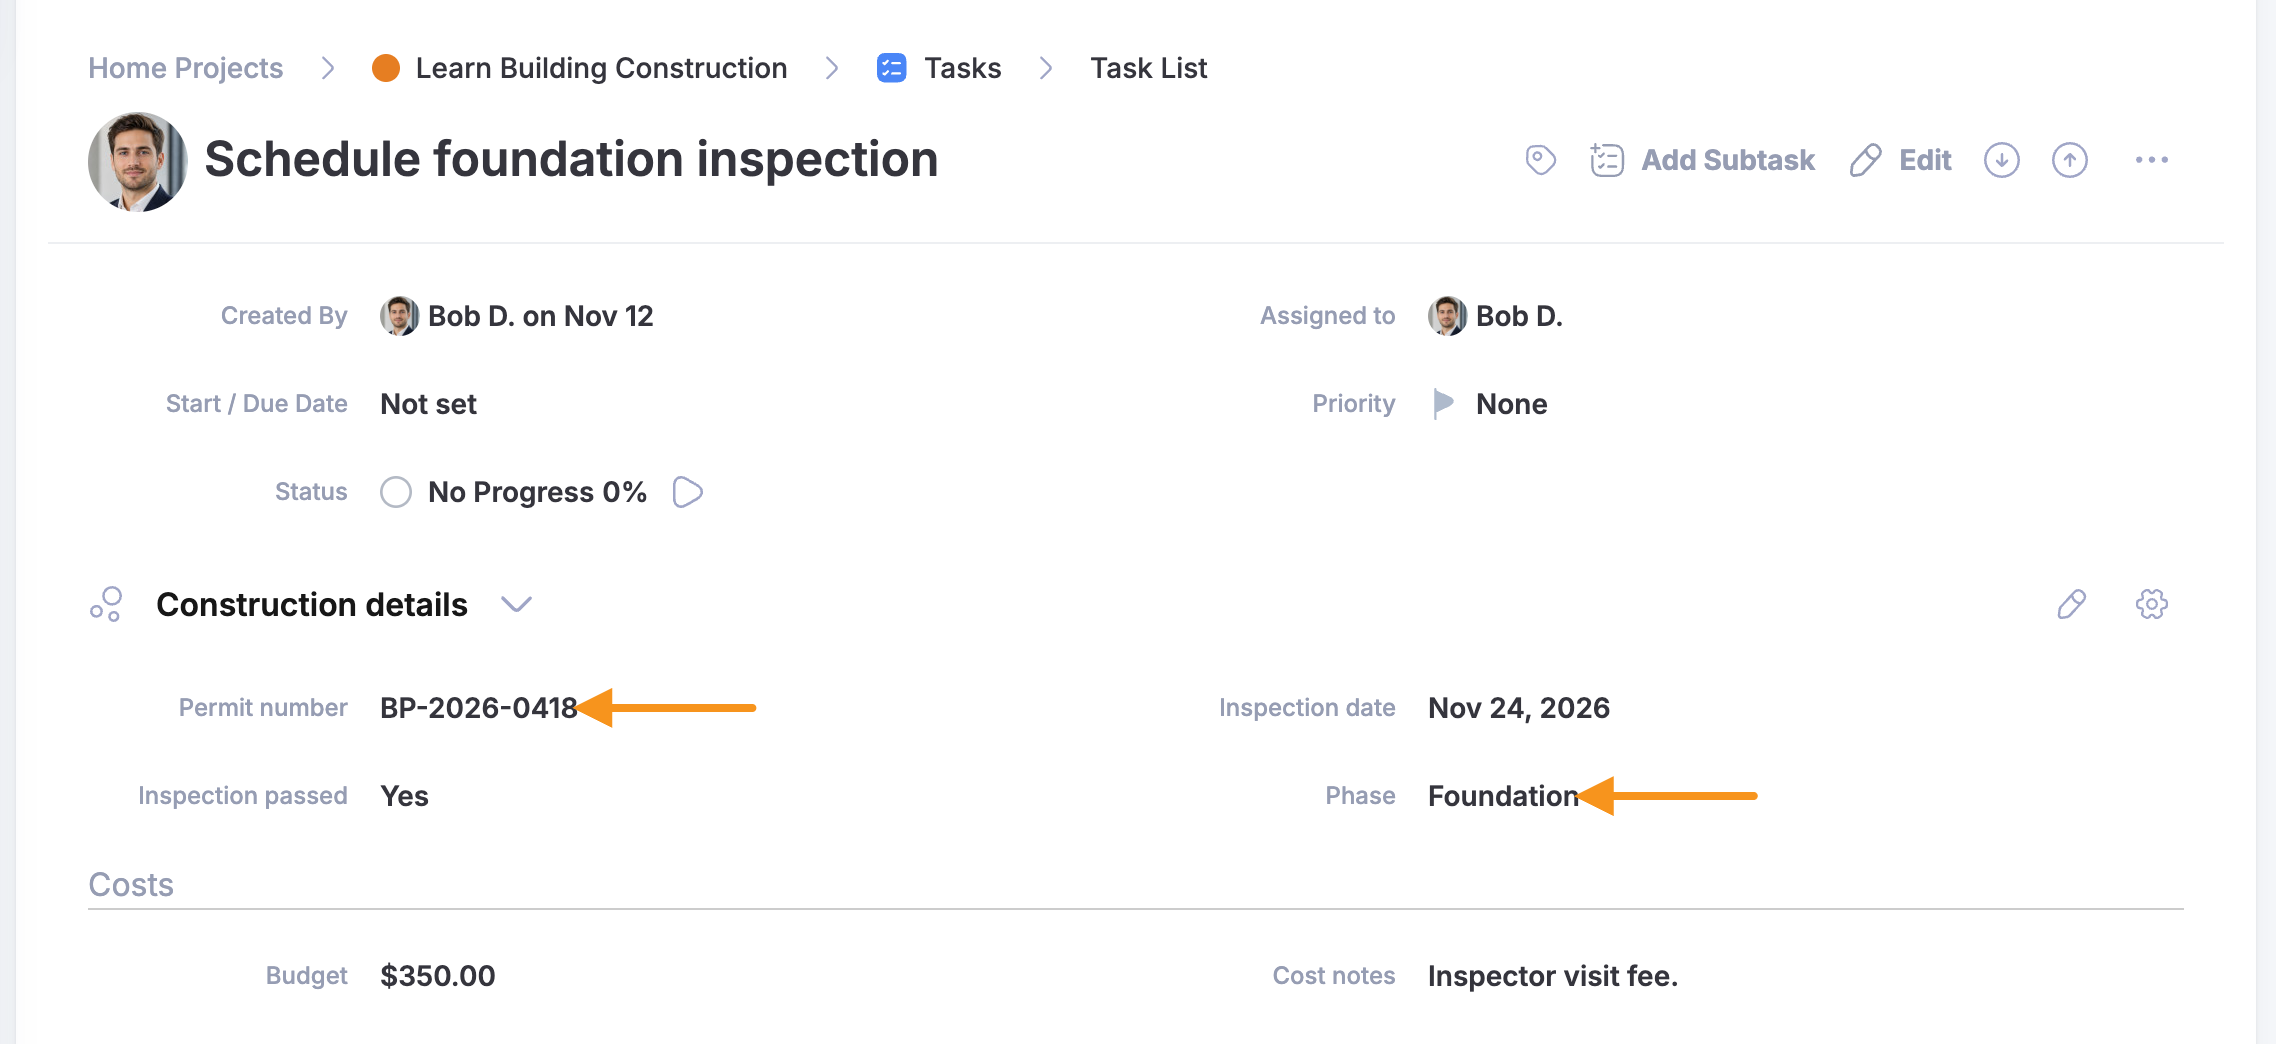
Here is an example of a task with new Custom Fields using a separator in a Custom Field Template:
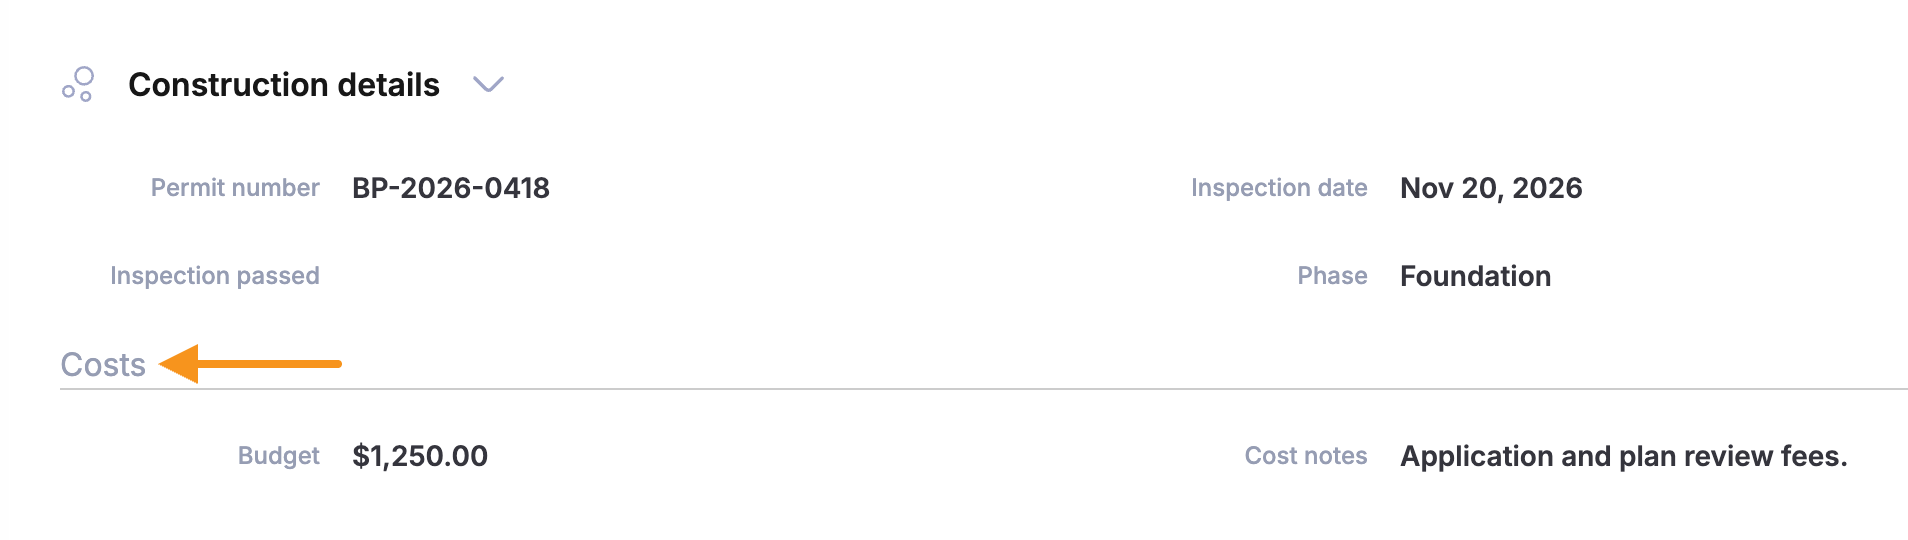
Drop-down fields
- The drop-down field does not have the required/not required attributes. You will need to specify a default value as the first entry like "Empty" or "N/A". When creating a task this first value will automatically be selected.
- There is no way to remove a value from the dropdown when you edit the task, just the ability to set it to the first value which should be considered as default.
- If you have only one template applied to a project and you did not enter any values when you created a task - a Custom Field Template will not be associated with a task*
* Considering that the drop-down can not have a blank value now - if you apply a custom field template having a dropdown, a custom field template will always be associated with a task at the time of its creation because the drop-down value will be set.
Using Custom Fields in Subtasks
It’s important to note that Subtasks do not automatically inherit the custom fields of a parent task.
You can apply a custom fields template and provide values to a subtask when you create it. To change the custom field template (if more than one is available in a project) or change custom field values simply edit a subtask.
Searching
Checkbox, Dropdown, and Date custom fields are available as filters in the Tasks application: click the Filter button and scroll to the bottom of the Filters panel, where a “Custom Template” filter is followed by the template's name and its fields.
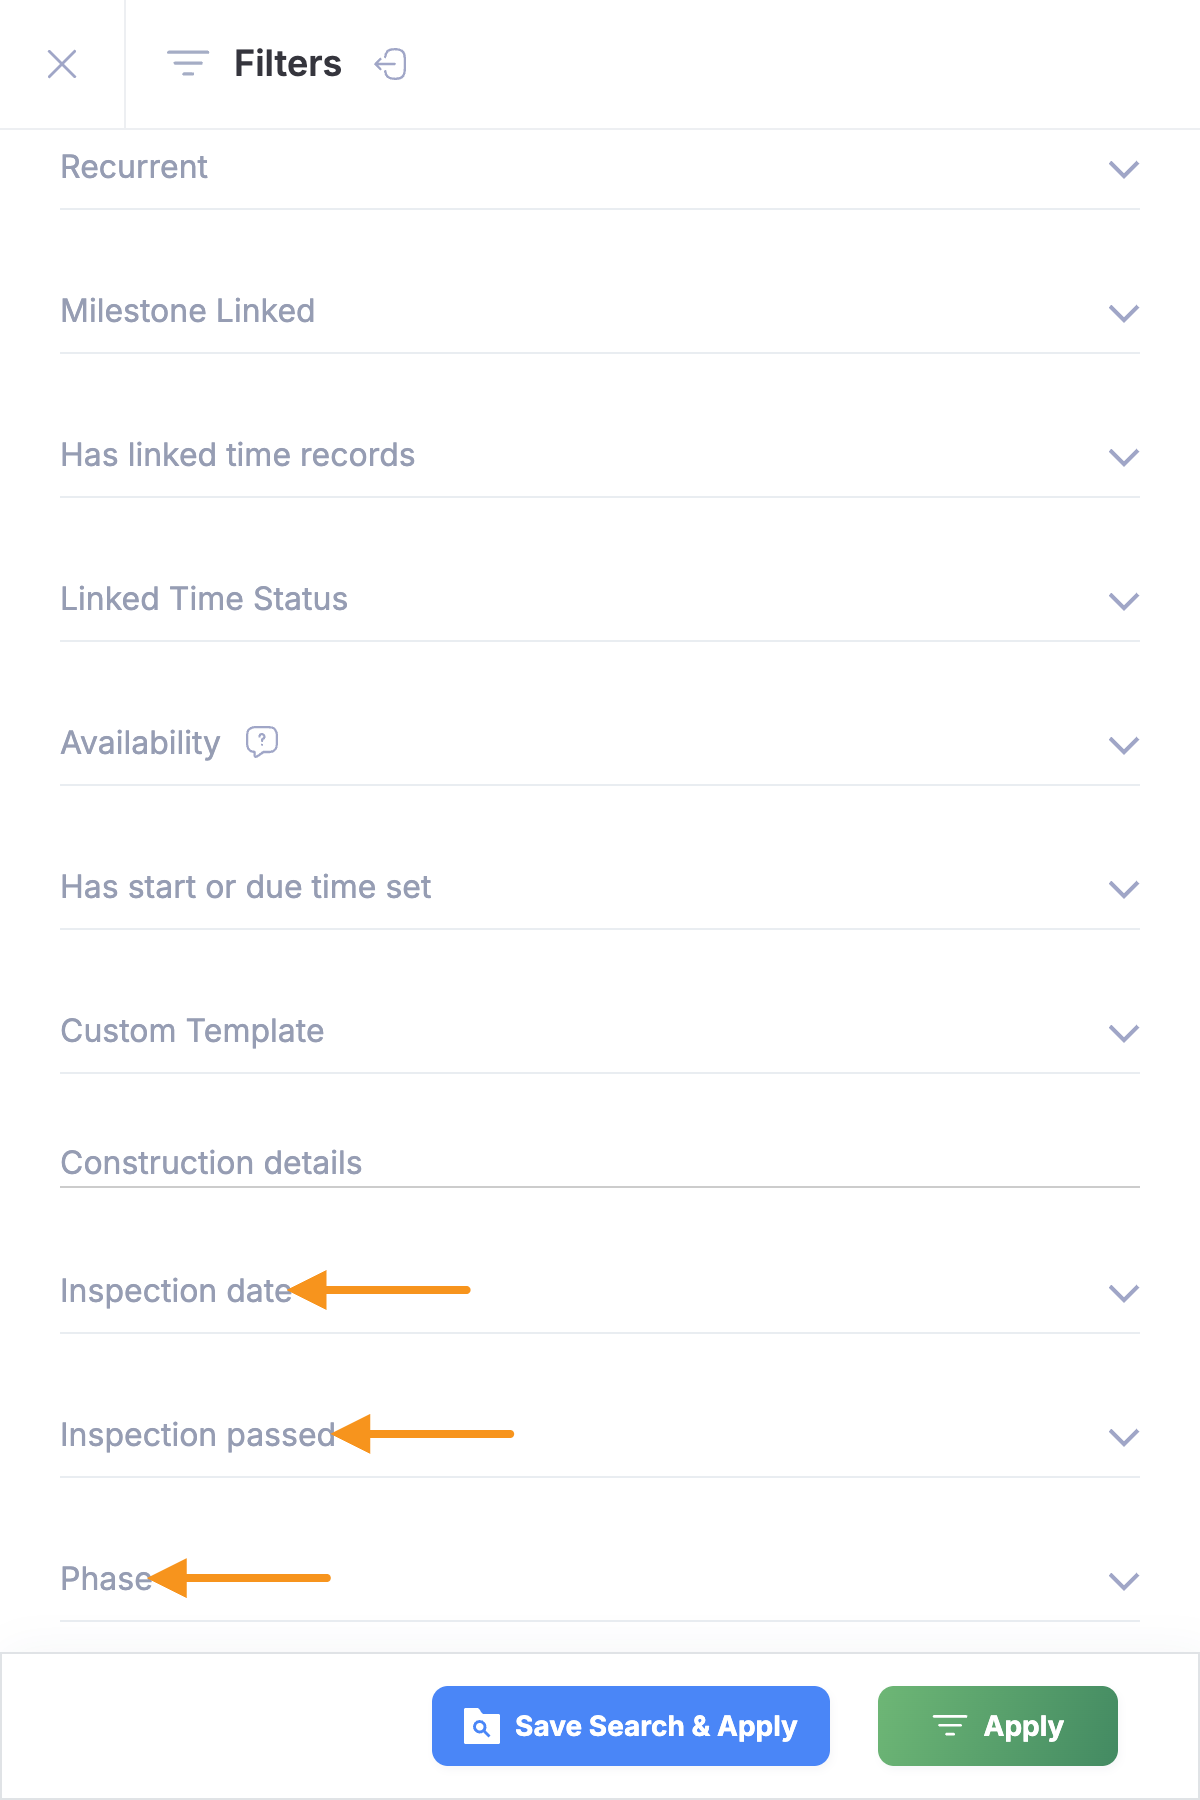
You can also use the “Search Text” field at the top of the same Filters panel:
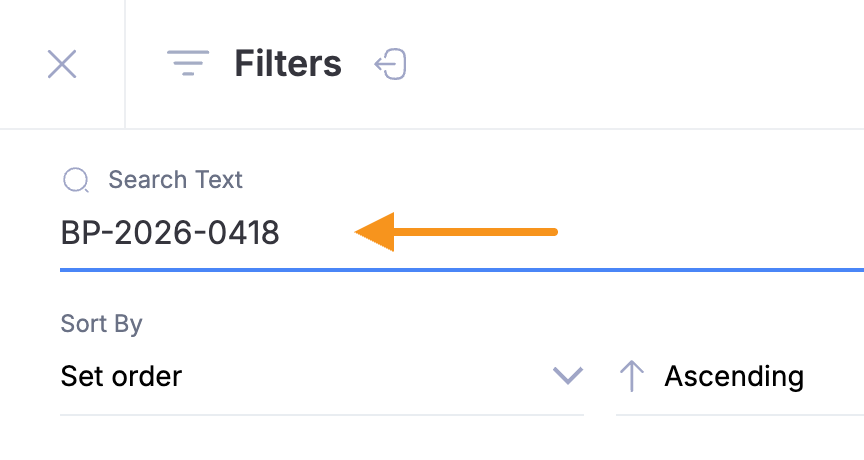
For all Custom Fields types except Dropdown and Checkbox. Both Tasks and project search will now search through Custom Fields as well. For searching a date value in Custom Field, please use the following format YYYY-MM-DD (like '2017-07-25').
XLS Export and Data Feed Links
Custom Fields data are added to XLS export and Data Feed Links, if:
- It is exported to XLS or a data feed link for a project (not a bunch of projects)
- Custom fields are enabled for this project
- There is at least one Custom Field value saved for any of the tasks included in XLS export or a Data Feed Link.
- XLS import supports Custom Fields except for a bulk import to multiple projects
Release Notes
Features not implemented yet:
- The daily recap email does not include custom field changes (instant email notifications about a task do list its custom field values)
- No default values (like 'today' for a date)
- No special validations ( like 'phone number' or 'date in the future')
We do not support Custom Fields yet in mobile applications, but working on adding it soon.
Important to know
- If you remove a field from Custom Fields Template - all saved values for this field in all tasks with this template in all projects will be removed;
- If you remove Custom Fields Template - you will also remove all saved values in all tasks with this Custom Fields Template in all projects;
- If you unlink Custom Fields Template from a project, you will delete all saved values in all tasks with this Custom Fields Template within this project*;
- If you change the Custom Fields Template for a task when editing it, you will delete all already entered values for previously used Custom Fields Template for this task*.
* You can't restore deleted or replaced values (you will need to set them again).
We'll show confirmation in all cases except the last one. A warning will tell you how many data entry points you will be deleting, so you will never make a mistake deleting valuable data.
Using Custom Fields vs. Tags
Tags and Custom Fields (available on Business/Enterprise plans) allow you to categorize and filter information in Freedcamp. In general, custom fields are best for extending tasks attributes for data collection, while tags are more informal. Depending on your workflow, you might find that your team uses them in different ways, but here are some scenarios to help you decide:
Use custom fields if you:
- Want to add certain extra fields to tasks in a project
- Have standard information you need to track on tasks across projects (Order Date - type 'date' & mandatory, Shipped - type 'checkbox', Special Notes - type 'text box')
- Want to make sure your team fill out certain information for each task in a project
- Need to filter or search by specific data fields - types 'date', 'checkbox' and 'drop-down list' are supported
Use tags if you:
- Do not want data collection but categorization
- Want an easy way to pull items across projects tagged similarly
- Want to give your team a flexible vs. mandatory option to classify data
Feedback
You can use this form to provide feedback.
Post a feature request by using the module name as a prefix, for example, '[Custom Fields - Tasks] - add validations'. Such 'responsible' posting makes it much easier for Freedcamp and our customers to find, vote, comment and prioritize development.
You are also welcome to email directly to help@freedcamp.com or here.
It does not matter what channel you select – we will treat your feedback will the greatest attention.