Calendar
Description
Freedcamp’s calendar brings together all your events, tasks, milestones, issues, and CRM tasks and calls. As long as they have a deadline, all your project items appear here, allowing you to keep track of everything you need to work on.
Direct integration with other sections of Freedcamp such as Tasks, Milestones, CRM, and Issue Tracker means you can add, edit and remove entries directly from the calendar.
Organize your team’s schedule with this powerful application!
Features include:
- Share your Freedcamp calendar to calendar apps like Google Calendar, Outlook or iCalendar
- Direct Google Calendar integration - GSync (on all paid plans)
- Direct integration with Tasks, Milestones, CRM, and Issue Tracker
- Create and edit items directly from the Calendar (drag & drop)
- Recurrent Events (on all paid plans), Multi-day events, Start/End times, RSVPs.
- Invite people outside Freedcamp to your events
- Add Attachments (including GDrive, OneDrive, and Dropbox on all paid plans)
- Ability to set week start date – Sunday or Monday
- Ability to set Business hours
- Monthly/Weekly/Daily and Agenda views, Deadline and Standard views, 4 different color themes
- Global Calendar board to see all your projects in one Calendar
- Ability to filter and save most used searches to instant access
Adding/Removing the Calendar Add-On
By default when you create a project, the Calendar application is already installed together with Tasks, Discussion, and Files. If you'd like to remove this add-on or manage which users have access to it, please see this documentation article.
Getting Started
Freedcamp has two calendar features: the Calendar application, which is project-based, and the Calendar Board, which is global. The Calendar application only shows you the entries of the particular project it belongs to, while the Calendar Board allows you to see the entries of all the projects you are involved in.
Accessing Project Calendar and the Calendar Board
You can use a project’s Calendar application if it was added by the project’s administrators (see ‘For Administrators’ section to manage Calendar application). There are multiple ways to access the Calendar application, as shown below: (1) inside a project, (2) in the project picker, (3) on the Projects Board, (4) on the Homepage.
![]()
![]()
![]()
![]()
note: click on the images above to enlarge them
To access the Calendar Board, click the Calendar icon on the top menu.

Settings, Views, and Filters
The filter menu (1) allows you to filter your Calendar items by application (Tasks, Events), Creator, User Assigned To, Priority, Progress, Date Created and Tags. Searches can be saved for later use by clicking the Save Search button (2).
By default, the Calendar application is set to be viewed by month, but there’s also the option to be viewed by day or by week(3).

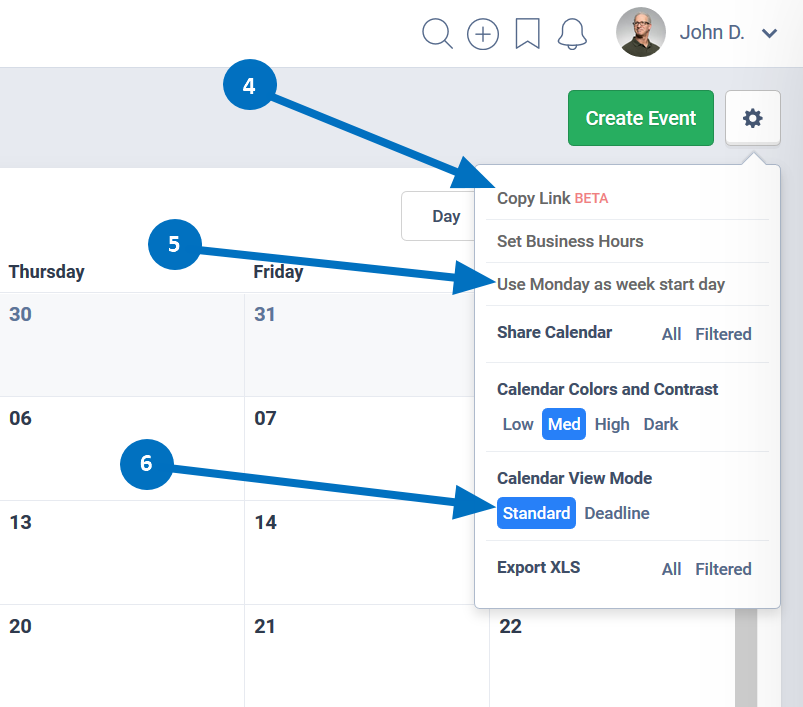
The gear icon menu offers some extra options, such as sharing your search or applied filters with another project member through the Copy Link(4) function.
You can also change the default start day of the week from Sunday to Monday(5) and switch between Standard and Deadline views(6).
note: Standard view displays items for their full duration. Deadline view only shows the start date and the end date, not the time in between. So events with start/due dates outside your current calendar period will be excluded in the Deadline view.
Managing Calendar Items
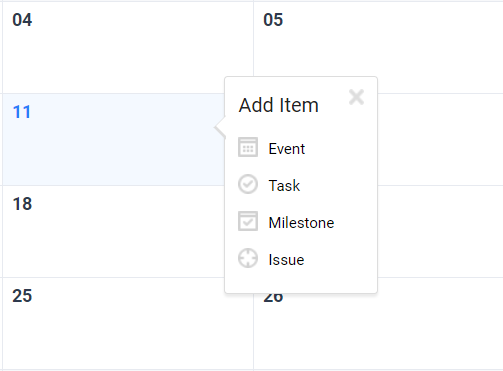
All items with a date can be created and managed from the calendar: Events, Tasks, Milestones, and Issues. To add a new item, click on the desired due date and select the type of entry you want to add. A new window will pop up where you’ll be able to add all the details like the title, description, assigned users, and priority level.
To edit or delete a calendar item, click it and choose the desired option from the menu.
Rescheduling
Calendar entries can be rescheduled by editing their details or by simply dragging and dropping as shown in the gif below.
Events
Events are the only items that are unique to the calendar application, and can not be created from anywhere else. Creating an event works just like creating other item types from the calendar: click the date, select the item type and add the details.
RSVP
You can add people to your event from the Invite section. Freedcamp will then send them an invitation email and they’ll be able to give an answer, add a note and even save the event to their calendar.
Inviting people outside Freedcamp
The event invite section will suggest project members, but invitations are not limited to Freedcamp users. You can invite anyone as long as you have their email address. Just like Freedcamp users, they’ll be redirected to a page where they can respond to the invite and add a note.
Event Organizer Email Notifications
As an event organizer, you can choose to get an invitation email yourself so you can add it to your calendar. And you can also choose to receive an email for every RSVP response so you can be up to date on who is attending and who isn’t.
Event Reminders
The Recap email reminds you of your events, as well as your tasks, calendar events, milestones, issues, and CRM tasks/calls. It has three sections: Overdue, Today, and Tomorrow/The Next 5 days. The default setting is set to daily(except weekends). There is the option to change it to weekly, but we don’t recommend that as you may miss upcoming events. For example, if a task was created on Tuesday with a start/end date Thursday/Friday the same week.
If you need a notification for each event, you can share your calendar to your preferred calendar application like Google Calendar, and custom notifications there.
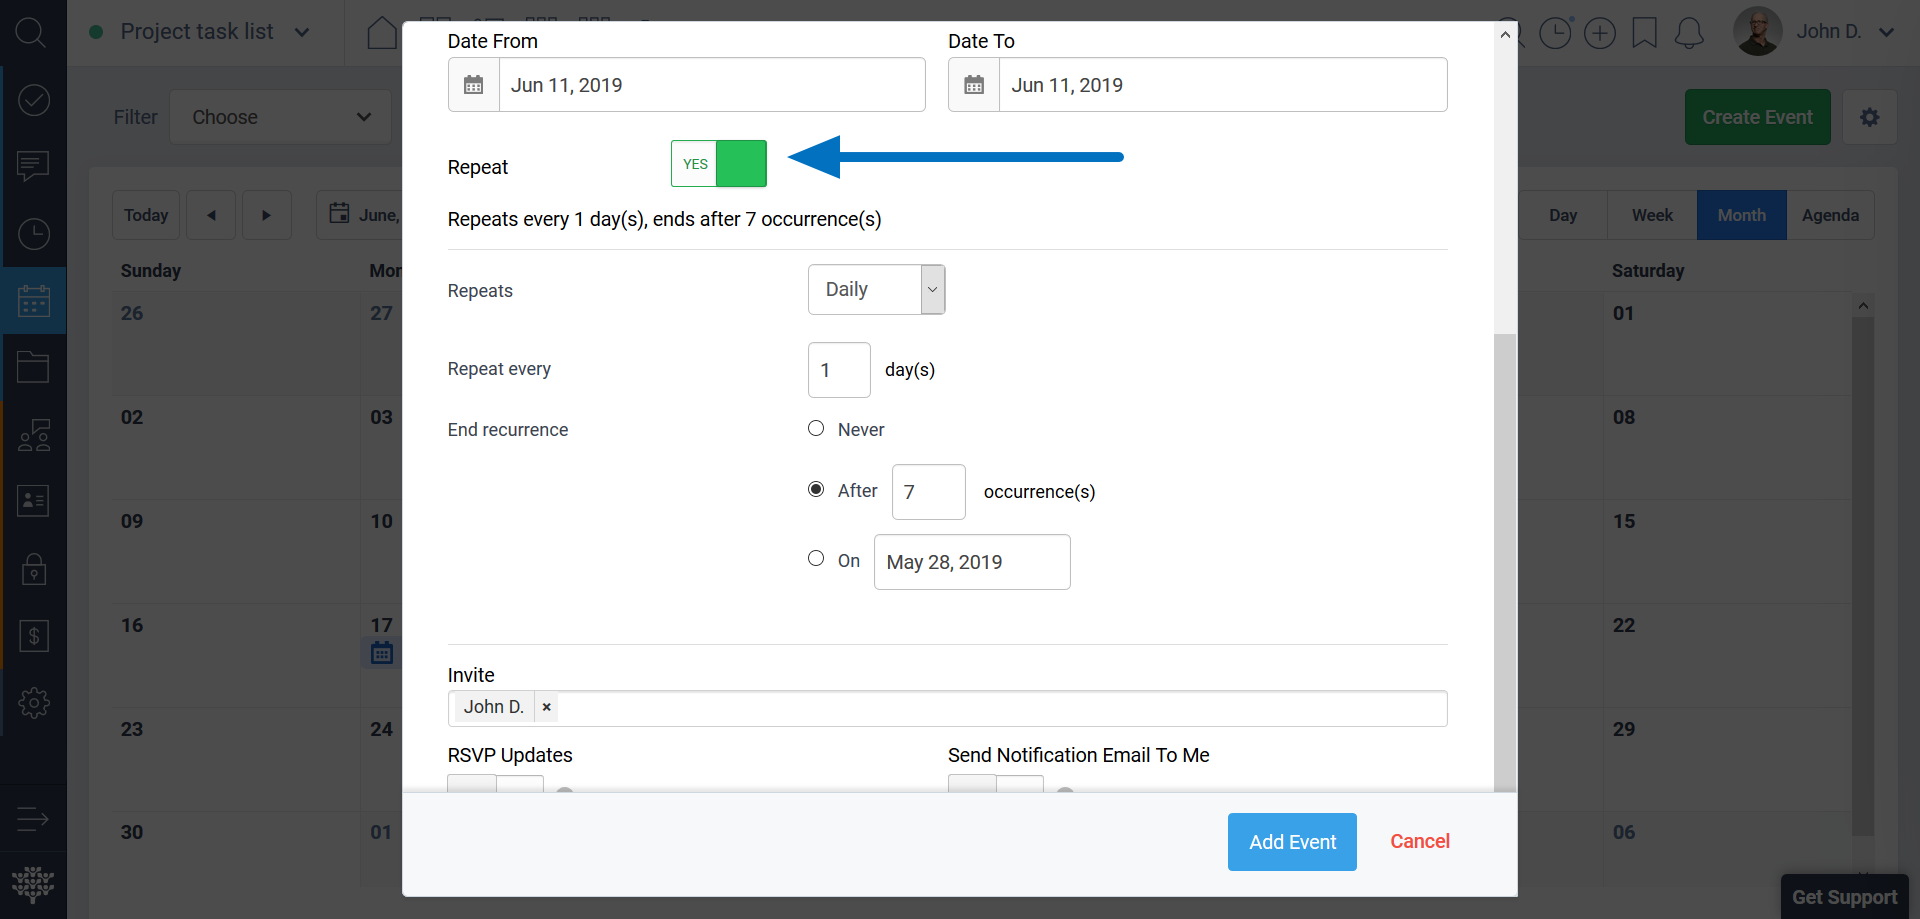
Recurring Events
Adding a recurring event is almost the same as adding a normal event. You have to click on the desired due date(or start date in this case) and select “Event” in the Add Item menu. The only difference is that after filling in all the details, you’ll have to also tick the “Repeat” box then choose the occurrence rate and the duration.
This also applies to the Calendar Board, except you’ll be prompted to choose the desired project after selecting the date.
Managing recurring events is done in one place and updated for all other instances:
– when you edit one – all instances are updated.
– when you reschedule an event – all recurrences are rescheduled
– when you delete an event – all recurrences are deleted
Sharing Calendars
Freedcamp offers two ways of sharing calendars: Importing the calendar to your preferred calendar application, or by Instant Google Sync with Google Calendar.
IMPORTANT! Freedcamp offers to share your Fredcamp calendars externally, not bringing external calendars in.
The difference between the two is that when importing a Freedcamp calendar, your calendar application determines or allows you to set how often your calendar will be updated. With Google Sync, changes from your Freedcamp Calendar appear in your Google Calendar within minutes(updates will simply be added on top of your Google Calendar events instead of overwriting them).
Extra benefits:
- Share the calendar from the Calendar Board globally without the need to do it in each project
- Apply filters on the Calendar Board or Project Calendar before sharing
- Share all the item’s attributes, including description and type (event, task, milestone, etc. )
- Manage all your shared Calendars on the new page under My Account > Calendars
Importing
In order to import a Freedcamp calendar to a 3rd party calendar application, you need to first generate the Freedcamp calendar link(this is what you’ll use to import the calendar to your calendar application).
- Go to the Calendar you want to share
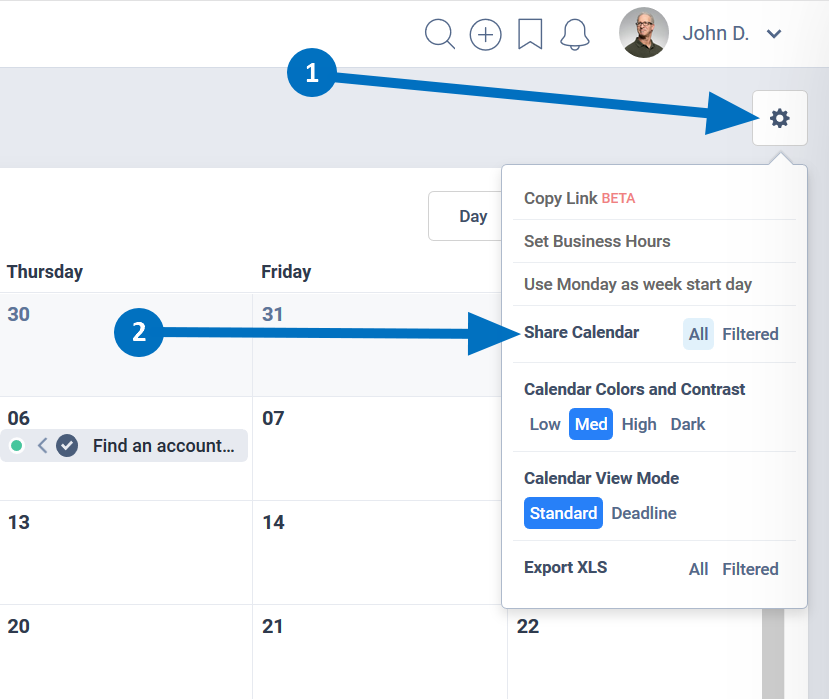
- Click the settings icon in the top-right of the page(1)
- Go to the Share Calendar option and select All or Filtered, depending on your preferences(2).
- Click the Create Link button and copy the generated link.
Importing calendar to Google Calendar
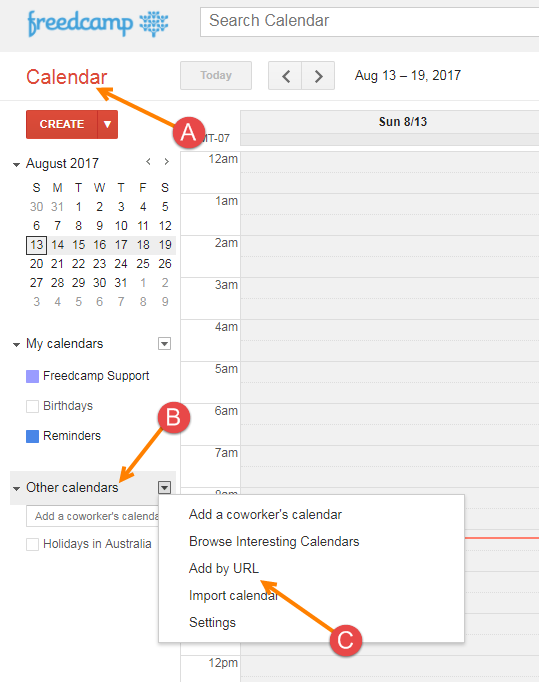
Open Google Calendar (A), select 'Other Calendars' (B), and 'Add by URL' (C). Paste the Freedcamp calendar link into the provided pop-up.
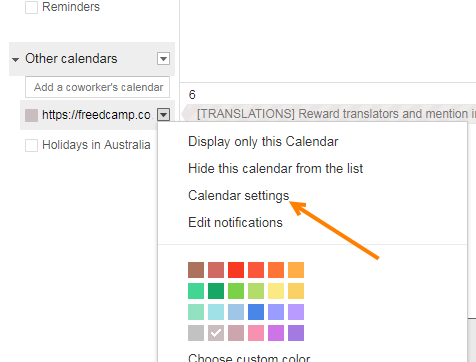
After adding the calendar, go to 'Calendar settings' to rename:
From our tests, Google refreshes such external calendars once a day.
Importing calendar to MS Outlook
Open 'Calendar' view (A), select 'Open calendar' and 'From Internet...' and paste the Freedcamp calendar link.
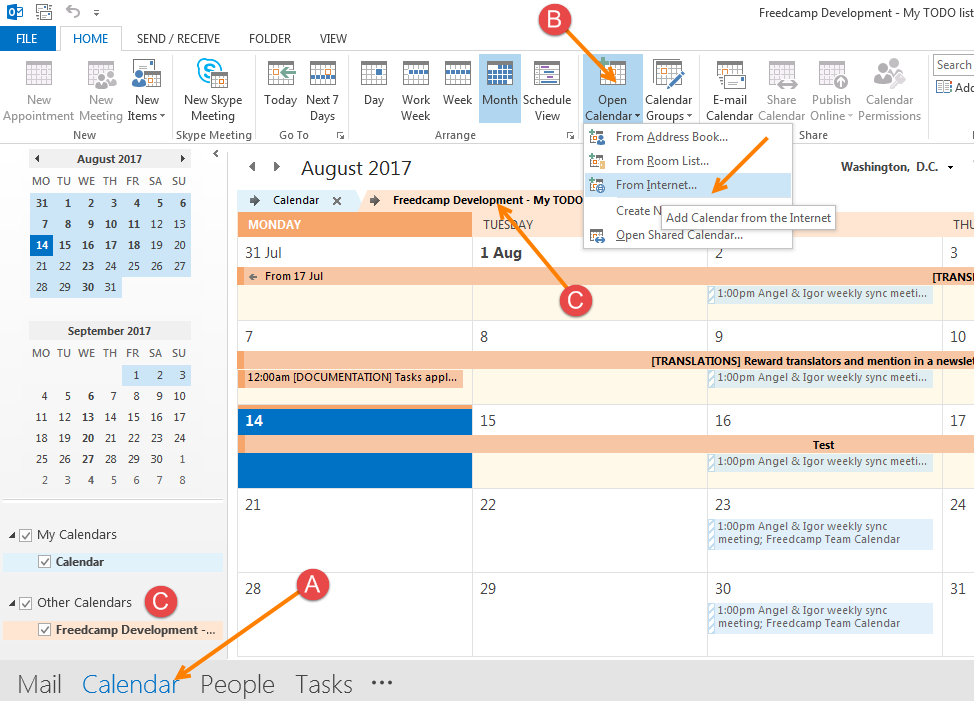
After the calendar is added, you can access it (C).
MS Outlook does not provide any settings as to how often the external calendar will be updated. Please check Microsoft documentation.
Importing calendar to Apple Calendar
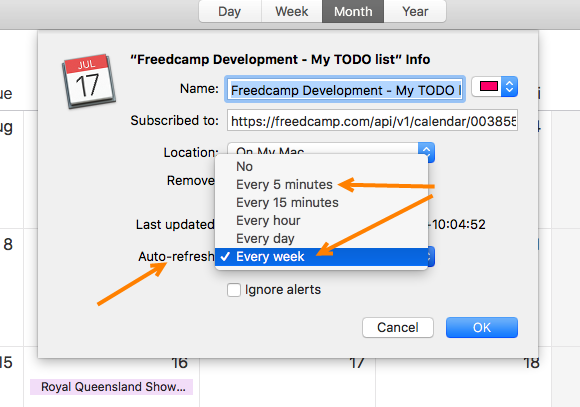
Open Apple Calendar, go to 'Files' (1), and select 'New Calendar Subscription...' (2)
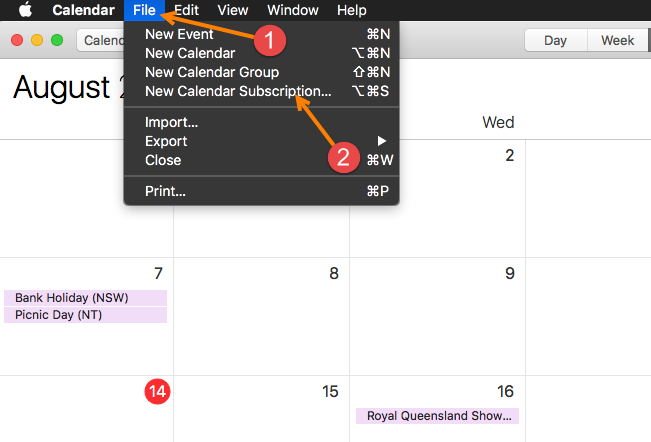
Apple provides an interface for you as to how frequently it will request Freedcamp for updates.
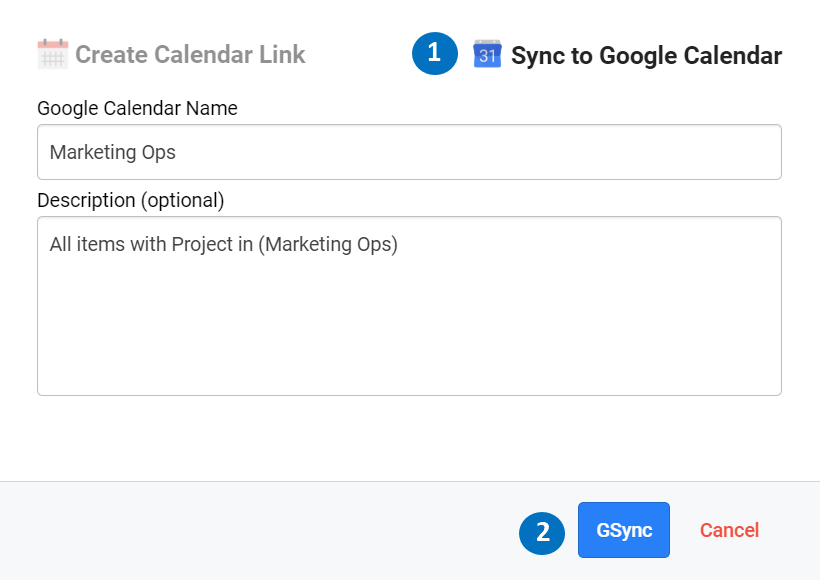
Google Sync
To use Google Sync, you follow the same steps as before: go to the Calendar you want to share, click the gear icon, go to the Share Calendar option and select All or Filtered. When the pop-up appears, you click on “ Sync to Google Calendar” then on the GSync button and select your account in the Google Auth pop-up.
Managing Shared Calendars
You can access and manage all your shared calendars by clicking on your username then selecting My Account from the dropdown menu. On your account settings page, go over to the left-hand menu and click on Calendars.
You’ll see all your shared calendars and you’ll be able to see their details, regenerate the link and delete them.
Shared calendars use cases
1. Bringing Freedcamp to your other calendar applications like Google Calendar, Apple Calendar, and Outlook. Google Sync allows adding extra reminders.
2. Sharing a project calendar with a client who doesn’t use Freedcamp.
3. Sharing projects portfolio with your stakeholders who only want to watch the progress of your work
Export to XLS
Freedcamp allows you to export your Calendar’s items to XLS for the past, current, and next month. This is useful for generating custom reports in Excel.
To export to XLS, go to your project’s Calendar App or to your Calendar Board, click on the gear icon then on “Export as XLS” In order to export, In order to do that you need to go to your project's Calendar page or to your Calendar Board, click the little gear icon on the top right of the page, go over to "Export XLS" in the dropdown menu and choose the month you want to export.
Roadmap
We plan to add the option to RSVP separately for each recurrence of an event you're invited to. We would like to know how important this is and any points from below have a higher or lower priority to be considered:
- should description and attachments be repeated or do you want to be able to change description and attachments independently for each recurrence
- are you interested in the possibility of rescheduling a selected event or all following events like Google Calendar?
Please set priorities 1/2/3 for the below and feel free to add your own points ranged by priority with ours.
(1/2/3) RSVP separately to each recurrence (planned)
(1/2/3) Edit description and files in each recurrence (considered)
(1/2/3) Reschedule this event and all the following (considered).
If you need a Calendar feature that we don't have right now, please post it here. You can also email us at help@freedcamp.com.